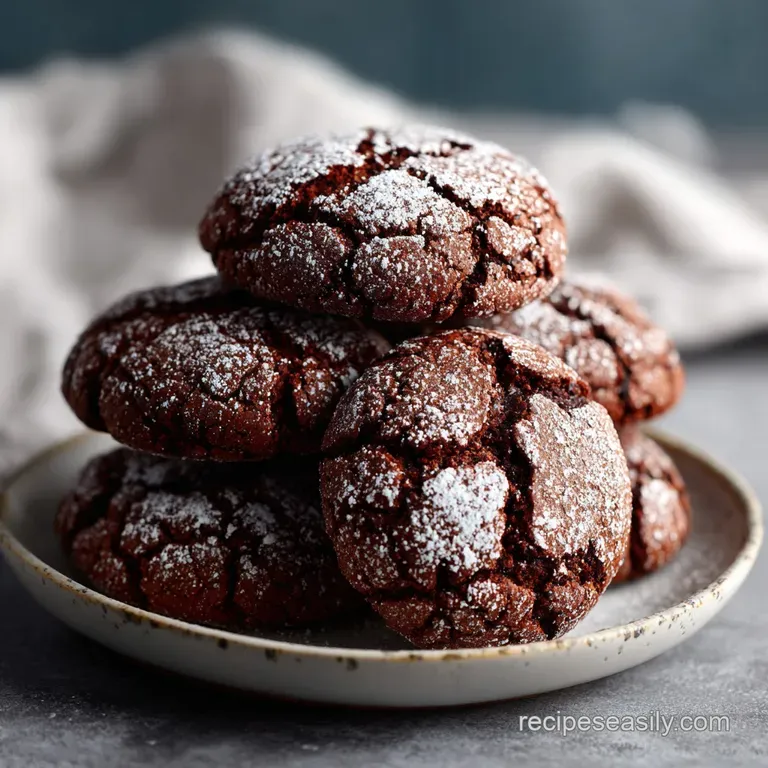
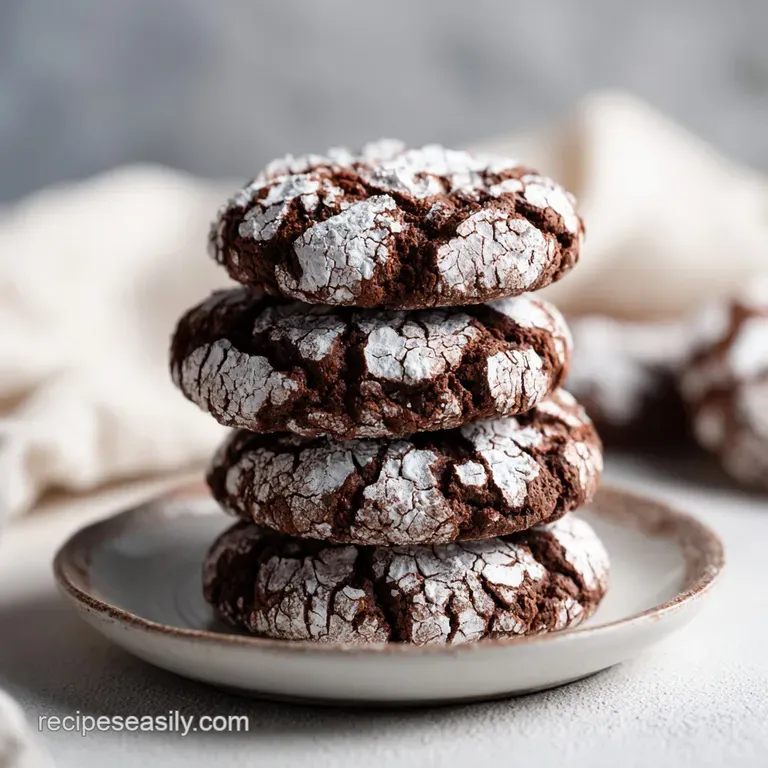
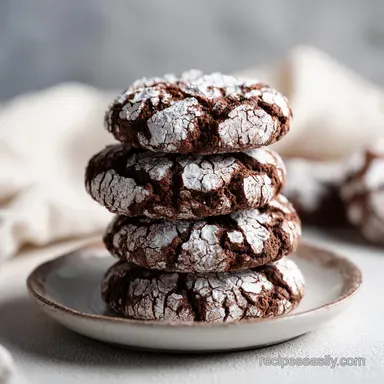
Chewy Chocolate Crinkle Cookies: Rich and Brownie-Like
- Time: Active 60 minutes, Passive 10 minutes, Total 70 minutes
- Flavor/Texture Hook: Velvety dark chocolate with a delicate sugar shatter
- Perfect for: Holiday cookie swaps or late night chocolate cravings
- The Secret to Perfectly Chewy Chocolate Crinkle Cookies
- The Mechanics of Those Iconic Deep White Cracks
- Selecting Your Components for the Deepest Flavor
- Essential Kitchen Tools for Fudgy Success
- Five Phases to a Fudgy Cookie Masterpiece
- Solving the Mystery of the Melting Powder
- Making Adjustments for Batch Size or Diet
- Keeping Your Cookies Fresh and Fudgy
- Ideas for Serving These Fudgy Treats
- Recipe FAQs
- 📝 Recipe Card
The Secret to Perfectly Chewy Chocolate Crinkle Cookies
Close your eyes and imagine the kitchen filling with the scent of dark, toasted cocoa. It’s that deep, heavy aroma that promises something fudgy is on the way. I remember the first time I pulled a tray of these out of the oven.
The contrast was breathtaking - deep, dark chocolate fissures peeking through a snowy landscape of powdered sugar. There is something incredibly satisfying about watching the dough expand and "crinkle" in real time through the oven glass.
It’s like a little edible science experiment happening right in your kitchen.
The real hero of this story is the unsweetened cocoa powder. I used to think any old cocoa would do, but I quickly learned that the cocoa is the soul of the chewy chocolate crinkle cookies. If you use a cocoa that is too light or dry, you end up with a dusty, bland biscuit.
But when you find that perfect, high-quality cocoa, it transforms the dough into something resembling a dense truffle. It’s the ingredient that provides that intense chocolate punch without the need for melting down actual bars of chocolate, keeping the process simple but the result sophisticated.
I’ve had my share of kitchen heartbreaks with these, though. There was one winter where I tried to rush the chilling process and ended up with flat, greasy puddles that looked more like dark pancakes than cookies. I realized then that patience isn't just a virtue, it's a structural requirement for this dough.
We are looking for a texture that is dense enough to hold its shape but soft enough to yield to a gentle bite. This balance is what makes this specific recipe a staple in my holiday baking rotation every single year.
The Mechanics of Those Iconic Deep White Cracks
Moisture Barrier: Rolling the dough in granulated sugar first prevents the powdered sugar from absorbing the dough's moisture and dissolving.
Leavening Lift: Baking powder creates a rapid upward expansion that forces the set surface of the cookie to tear open into fissures.
Sugar Recrystallization: The high sugar to flour ratio ensures the edges set quickly into a delicate "shatter" texture while the center remains soft.
| Method | Time | Texture | Best For |
|---|---|---|---|
| Freezer Flash Chill | 45 minutes | Ultra thick, fudgy center | High contrast white cracks |
| Fridge Chill | 4 hours | Slightly flatter, softer edge | A more uniform crinkle pattern |
| Room Temp Dough | 0 mins | Thin and greasy | Not recommended for this recipe |
Chilling the dough is non negotiable because it solidifies the fat, which in this case is vegetable oil. If the oil is too warm when it hits the oven, it spreads immediately, losing that tall, chewy profile we want.
The freezer chill is a fantastic shortcut that tightens the dough's structure in less than an hour, making it easy to handle and roll without leaving your hands covered in sticky chocolate.
Selecting Your Components for the Deepest Flavor
| Component | Science Role | Pro Secret |
|---|---|---|
| Unsweetened Cocoa | Provides structure and deep flavor | Sift it twice to remove every single lump |
| Vegetable Oil | Keeps the crumb moist and tender | Use a neutral oil like grapeseed for purity |
| Large Eggs | Acts as the primary emulsifier | Ensure they are room temp for a smooth dough |
| Granulated Sugar | Creates the initial moisture shield | Use extra fine sugar for better coverage |
The foundation of this recipe relies on simple pantry staples, but the way they interact is quite specific. For instance, using oil instead of butter ensures the cookies stay soft for days on end, as oil remains liquid at room temperature. This is why these are often described as "fudgy" rather than "crispy."
- - 250g All purpose flour
- Why this? Provides the protein needed to hold the cookie's tall shape. (Substitute: 1:1 gluten-free baking flour)
- - 100g Unsweetened cocoa powder
- Why this? Use a high-quality Dutch processed cocoa for a darker color. (Substitute: Cacao powder for a more bitter note)
- - 300g Granulated sugar
- Why this? Sweetens the cocoa and creates the fudgy interior texture. (Substitute: Caster sugar)
- - 120ml Vegetable oil
- Why this? Ensures a moist, long lasting chew that butter cannot provide. (Substitute: Melted coconut oil)
- - 4 Large eggs
- Why this? Provides the lift and rich mouthfeel. (Substitute: 1 cup unsweetened applesauce, though texture will change)
- - 2 tsp Baking powder
- Why this? The engine behind the "crinkle" expansion. (Substitute: 1/2 tsp baking soda + 1 tsp cream of tartar)
- - 2 tsp Vanilla extract
- Why this? Rounds out the harshness of the cocoa. (Substitute: Almond extract for a cherry choc vibe)
- - 0.5 tsp Salt
- Why this? Essential for balancing the high sugar content. (Substitute: Sea salt)
- - 50g Granulated sugar (for coating)
- Why this? The invisible shield that protects the white finish. (Substitute: Turbinado sugar)
If you find yourself out of vegetable oil, you can certainly use melted coconut oil, but keep in mind it will add a slight tropical note. For those who want an even more intense experience, adding a teaspoon of espresso powder to the dry ingredients can make the chocolate flavor truly pop. If you are looking for a different style of chocolate treat, you might enjoy my Soft Chocolate Sugar Cookies which offer a similar comfort with a simpler finish.
Essential Kitchen Tools for Fudgy Success
1. The Mechanical Scoop
Using a 1.5 tablespoon mechanical scoop is the only way to ensure every cookie is the same size. This isn't just about being a perfectionist. If your cookies are different sizes, the small ones will dry out and turn crunchy while the large ones remain raw in the middle.
The scoop also keeps the heat from your hands away from the dough, preventing it from getting too sticky to roll.
2. high-quality Silicone Mats
I swear by silicone baking mats for these. They provide a bit of insulation from the bottom of the pan, which prevents the sugar on the bottom of the cookie from scorching before the middle is set. If you don't have mats, heavy duty parchment paper is a must.
Never bake these on a naked, greased cookie sheet, as the sugar will stick and cause the cookies to tear when you try to move them.
Five Phases to a Fudgy Cookie Masterpiece
- Whisk the base. In a large bowl, whisk together the 120ml vegetable oil, 300g granulated sugar, and 100g cocoa powder. Note: It will look like wet sand; this is normal.
- Emulsify the eggs. Add the 4 large eggs one at a time, whisking vigorously after each addition. Mix in the 2 tsp vanilla extract until the batter looks glossy and smooth.
- Fold the dry ingredients. Sift the 250g flour, 2 tsp baking powder, and 0.5 tsp salt directly over the wet mix. Use a spatula to fold gently. Cook until no white streaks remain, but do not overmix.
- The Flash Chill. Cover the bowl tightly with plastic wrap and place it in the freezer for 45 minutes. Note: This rapid chill makes the sticky dough manageable for rolling.
- Prep the station. Preheat your oven to 175°C (350°F). Set out two shallow bowls: one with the 50g granulated sugar and one with the 120g confectioner's sugar.
- Scoop and roll. Use your 1.5 tablespoon scoop to form balls. Roll each ball in the granulated sugar first until fully coated. Ensure the ball is completely covered to protect the next layer.
- The snowy coat. Immediately drop the ball into the confectioner's sugar. Roll it around until it has a heavy, thick layer of white. Do not shake off the excess.
- Bake to finish. Place balls on the prepared pans 5cm apart. Bake for 10 minutes until the edges are set and deep cracks appear.
- The cooling rest. Let the cookies sit on the hot pan for 5 minutes. Note: They are very soft when they first come out and need this time to "set" their structure.
- Transfer. Move them to a wire rack to cool completely. The sugar coating will become crisp as they reach room temperature.
For those who are just starting their baking journey, this is a fantastic entry point because the dough is forgiving. If you want to see a version that's even faster, you can check out my Easy Chocolate Crinkle Cookies which streamline the process even further.
Solving the Mystery of the Melting Powder
One of the most common frustrations with this dish is when the beautiful white sugar seems to disappear or turn gray during the bake. This usually happens because the dough is too warm or the moisture in the dough is "eating" the sugar.
The double coating method I use is the ultimate fix for this, but sometimes other issues creep in.
Why Your Cookies Are Flat
If your cookies spread into thin wafers, your dough was likely too warm. The 45 minute freezer chill is a hard requirement. If the kitchen is very hot, work in small batches, keeping the rest of the dough in the freezer while the first tray bakes.
Another culprit could be expired baking powder; if it's old, it won't provide the "lift" needed to keep the cookie tall.
| Problem | Root Cause | Solution |
|---|---|---|
| Sugar turns yellow/gray | Dough was too wet | Use the granulated sugar "barrier" coat first |
| No crinkles formed | Oven was too cold | Use an oven thermometer to ensure 175°C |
| Cookies are dry/crumbly | Too much flour used | Measure flour by weight (250g) not by volume |
Common Mistakes Checklist - ✓ Don't skip the sifting step for the cocoa; lumps will not dissolve during baking. - ✓ Avoid over rolling the dough in your hands; the heat from your palms melts the fat.
- ✓ Never grease your baking sheets; use parchment or silicone to prevent spreading. - ✓ Check your oven temperature; these need the "shock" of 175°C to crack properly. - ✓ Don't pull them out too early; the edges should feel firm to a light touch.
Making Adjustments for Batch Size or Diet
Scaling this recipe is fairly straightforward because the ratios are quite stable. If you want to make a double batch for a large party, you can simply double all ingredients. However, be careful with the leavening; sometimes doubling the baking powder can lead to a slightly metallic taste.
I usually stick to 1.5x the baking powder when doubling the rest of the recipe.
| Fresh Homemade | Shortcut Box Mix | Flavor Impact | Savings |
|---|---|---|---|
| High grade cocoa | Pre mixed base | Fresh has deeper, darker notes | Save $2-4 per batch |
| Fresh large eggs | Egg powder | Fresh is much fudgier and richer | Higher nutritional value |
| Custom vanilla | Artificial flavor | Real vanilla adds floral complexity | Better aromatic experience |
If you need to make these dairy-free, you are already in luck! This recipe uses oil instead of butter, so it’s naturally dairy-free as long as your cocoa powder doesn't have added milk solids.
For a gluten-free version, a high-quality 1:1 flour blend works remarkably well because the cocoa powder does a lot of the heavy lifting for the structure.
Decision Shortcut - If you want a "fudgy brownie" texture, bake for exactly 9 minutes and let them cool on the pan. - If you want a "cakey" texture, add an extra 30g of flour and bake for 11 minutes.
- If you want "maximum white contrast," roll the balls in powdered sugar twice before baking.
Keeping Your Cookies Fresh and Fudgy
The high sugar and oil content in these cookies means they stay soft much longer than a standard butter cookie. I've found they actually taste better on day two once the flavors have had a chance to meld.
- - Room Temperature
- Store in an airtight container for up to 5 days. Put a piece of parchment between layers to keep the sugar from sticking.
- - Freezer
- These freeze beautifully! You can freeze the baked cookies for up to 3 months. Just thaw them at room temperature for an hour before serving.
- - Zero Waste Tip
- If you have leftover sugar from the coating bowls, don't throw it out! Sift the granulated sugar to remove any cocoa bits and save it for your next batch. Any broken cookie pieces make an incredible topping for vanilla bean ice cream.
Chef's Tip: If the cookies start to get a little firm after a few days, pop one in the microwave for exactly 8 seconds. It revives that "just baked" fudgy center perfectly.
Ideas for Serving These Fudgy Treats
When it comes to serving these chewy chocolate crinkle cookies, simplicity is your friend. They are so visually striking that they don't need much help. I love serving them on a plain white or wooden platter to let the "snow and soot" contrast really shine.
They are a natural partner for a cold glass of milk, but if you're feeling fancy, a small glass of ruby port or a dark roast coffee is a grown up dream.
Another fun idea is to make "Crinkle Sandwiches." Take two cookies of similar size and sandwich a layer of peppermint buttercream or vanilla gelato between them. The crunch of the sugar shell against the soft filling is a textural masterpiece.
Whatever you do, make sure you have a napkin nearby that powdered sugar has a way of finding its way onto everything, but that's just part of the charm! Enjoy the process, and don't worry if your hands get a little chocolatey along the way. That's how you know you're doing it right.

Recipe FAQs
How to make crinkles more chewy?
Chill the dough for the full 45 minutes in the freezer. This flash chill prevents the dough from spreading too thin, keeping the centers dense and fudgy while the edges set properly.
What are common crinkle baking mistakes?
Overbaking is the most frequent error. Pull the cookies from the oven at exactly 10 minutes when the edges are set; leaving them in longer results in a dry, cakey texture rather than the intended chewy bite.
How do I get my cookies to be chewy?
Ensure you do not overmix the flour. Once you add the dry ingredients, fold gently with a spatula until no white streaks remain; if you enjoyed mastering light crumb structures here, apply the same delicate folding technique to these cookies to keep them tender.
What is the secret to chewy chocolate cookies?
Prioritize the double coating technique. Rolling the dough balls first in granulated sugar creates a moisture barrier, while the second coating of confectioner's sugar ensures a thick, crackled shell that traps moisture inside the cookie.
Can I store the dough for later?
Yes, freeze scooped dough balls for up to 3 months. Place them on a tray to harden, then transfer to a freezer safe bag, adding a few extra minutes to the bake time if you bake them straight from frozen.
Why did my powdered sugar disappear?
You likely skipped the granulated sugar layer. Without that initial roll in granulated sugar, the moisture from the dough will dissolve the confectioner's sugar into the cookie before the cracks have a chance to form.
Should I use a different oven temperature?
No, stick to 350°F (175°C). This specific temperature allows the cookies to rise and create those signature deep fissures without scorching the outer layer of confectioner's sugar.
Chewy Chocolate Crinkle Cookies
Ingredients:
Instructions:
Nutrition Facts:
| Calories | 175 kcal |
|---|---|
| Protein | 2.9 g |
| Fat | 6.1 g |
| Carbs | 29.8 g |
| Fiber | 1.4 g |
| Sugar | 19.6 g |
| Sodium | 98 mg |
