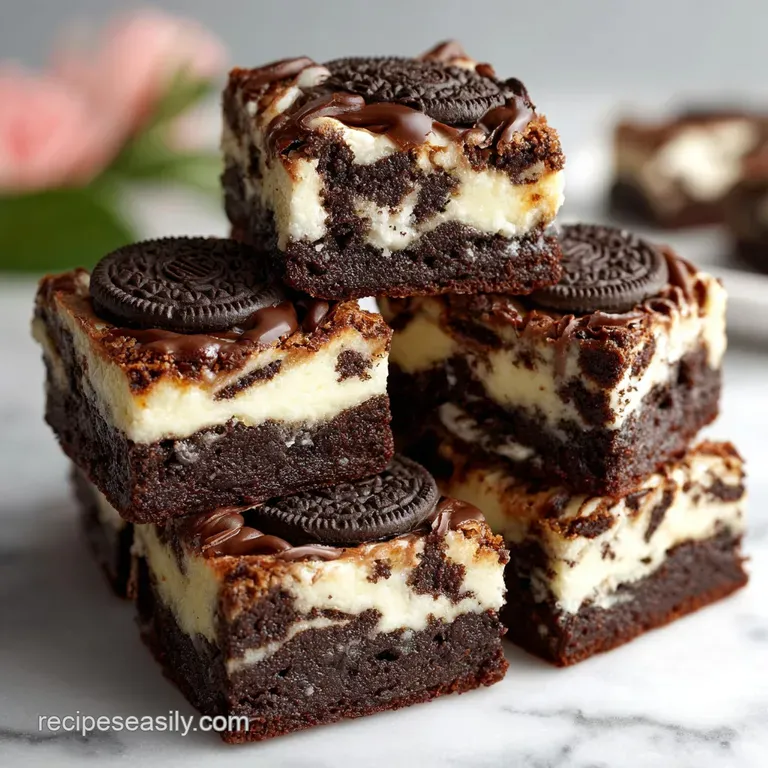
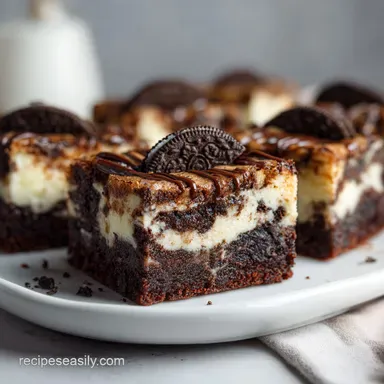
Easy Oreo Cheesecake Brownies with Creamy Swirl
- Time: Active 15 minutes, Passive 40 minutes, Total 55 minutes
- Flavor/Texture Hook: Deeply fudgy dark chocolate base with a velvety, tangy cheesecake shatter top.
- Perfect for: Weekend indulgence, potlucks, or when you need a serious chocolate "hug."
- The Hidden Mechanics Of The Fudgy Swirl
- A Component Analysis Of Our Ingredients
- The Elements Required For Success
- Assembling The Perfect Oreo Cheesecake Brownies
- Navigating Common Baking Hurdles
- Adjusting the Yield for Any Crowd
- Common Misconceptions About Brownie Baking
- Preservation and Reducing Kitchen Waste
- Creative Ways To Serve Your Masterpiece
- Recipe FAQs
- 📝 Recipe Card
The Hidden Mechanics Of The Fudgy Swirl
To get that legendary texture, we have to look at what's happening inside the oven. Most brownies fail because they lean too hard into "cake" territory, usually from too much flour or over beating the eggs. In this recipe, we are manipulating the fat to flour ratio to keep things heavy and moist.
- Fat Saturation: Using 3/4 cup of melted butter ensures the flour particles are fully coated, which inhibits gluten development and keeps the crumb tight and fudgy.
- Hygroscopic Balance: The 1 1/2 cups of granulated sugar pull moisture from the eggs and cream cheese, creating that signature "shiny" crackle top as the sugar migrates to the surface during baking.
- Protein Stability: Adding an extra egg yolk to the cheesecake layer prevents it from becoming rubbery, keeping it silky even when the brownie base is cooked through.
- Starch Gelatinization: Dutch process cocoa has been treated with alkali, meaning it won't react with acids; this allows the chocolate flavor to stay "dark" and mellow without a metallic aftertaste.
| Strategy | Speed | Texture Result | Best For |
|---|---|---|---|
| From Scratch | 55 mins | Ultra dense, dark, and complex | Special occasions |
| Box Mix Shortcut | 40 mins | Sweeter, lighter, more airy | Quick weeknight cravings |
| No Bake Style | 20 mins | Pudding like and soft | Summer (no oven heat) |
The main difference you'll notice between the shortcut and our scratch method is the "after bite." A box mix often leaves a film of oil on the palate, whereas the high-quality cocoa and real butter in our version melt away cleanly, leaving only the taste of dark chocolate and cream.
A Component Analysis Of Our Ingredients
Before we start mixing, it’s worth looking at why we’re using these specific items. Baking is chemistry, and every gram of sugar or fat has a job to do. I learned the hard way that "substitutions" aren't just swaps they change the structural integrity of the dessert.
| Ingredient | Science Role | Pro Secret |
|---|---|---|
| Dutch Process Cocoa | Provides deep color and low acidity | Sift it with the flour to prevent "cocoa bombs" (bitter dry pockets). |
| Full Fat Cream Cheese | Acts as the tangy structural ripple | Always use the block form; tub style spread has too much water. |
| Large Eggs | The primary binder and leavener | Crack them into a bowl first to ensure they are at room temperature. |
| Oreo Cookies | Texture contrast and salt | Don't over crush; you want "shards" for a varied mouthfeel. |
Using room temperature eggs is non negotiable here. If you drop cold eggs into melted butter, the butter will seize and create tiny clumps, ruining that "liquid silk" batter we’re after. It's a similar principle to making a Moist Vanilla Cupcakes recipe, where temperature synergy is the key to a smooth emulsion.
The Elements Required For Success
You don't need a professional pastry kitchen to pull this off, but a few specific tools will make your life significantly easier. I once tried to make these in a glass casserole dish without parchment paper, and I ended up eating the brownies with a spoon directly from the pan because they wouldn't come out.
For the best results, grab a 20x20 cm (8x8 inch) square metal baking pan. Metal conducts heat more efficiently than glass, which helps get those crispy, chewy edges. You'll also want a sturdy whisk for the brownie base since we aren't using a stand mixer, your arm is going to get a bit of a workout.
A rubber spatula is essential for folding in the flour gently. Finally, parchment paper is your best friend. Leave an "overhang" on two sides so you can lift the entire block of brownies out of the pan once they've cooled. It makes slicing them into 16 perfect squares a breeze.
Assembling The Perfect Oreo Cheesecake Brownies
This process is about layering. We want the brownie base to be the foundation, but the cheesecake shouldn't just sit on top it needs to be integrated enough that you get both flavors in every single forkful.
- Prep the environment. Preheat your oven to 175°C and line your pan with parchment paper. Note: Lightly greasing the pan before laying the paper helps it stick to the corners.
- Melt and marry. Combine the 3/4 cup melted butter and 1 1/2 cups granulated sugar in a large bowl, whisking until the mixture looks grainy and shiny.
- Emulsify the base. Add the 3 large eggs and 1 tbsp vanilla, whisking vigorously for 2 full minutes until the batter lightens in color and looks smooth.
- Fold the dry. Sift in 3/4 cup Dutch process cocoa, 3/4 cup all purpose flour, and 1/2 tsp sea salt. Note: Stop mixing the second the last white streak of flour disappears to keep them fudgy.
- Add the crunch. Gently fold in the 10 roughly chopped Oreo cookies.
- Create the cream. In a separate bowl, beat 8 oz softened cream cheese with 1/4 cup sugar, 1 egg yolk, and 1/2 tsp vanilla until completely lump free and velvety.
- The layer logic. Pour most of the brownie batter into the pan, then dollop the cheesecake mixture on top. Spread the remaining brownie batter in small spots over the cheese.
- The swirl technique. Use a butter knife to swirl the two together in a figure eight motion. Stop before the colors blend into a solid gray.
- The final touch. Sprinkle the remaining 6 crushed Oreo cookies over the top.
- Bake to perfection. Slide into the oven for 40 minutes until the edges are set and the center barely wobbles when shaken.
Once they're out, resist the urge to cut them immediately. The residual heat is still "setting" the cheesecake layer. If you cut too early, the center will be molten and messy. Trust me, waiting an hour is the hardest part of the recipe, but it's worth it for those clean, professional looking layers.
Navigating Common Baking Hurdles

Brownies are generally forgiving, but the addition of a cheesecake layer adds a layer of complexity. Sometimes the temperatures aren't quite right, or the oven has a "hot spot" that throws things off. If your brownies aren't looking quite like the photos, don't panic.
Why the cheesecake layer became grainy
This usually happens when the cream cheese wasn't truly softened or if it was over beaten. If the cream cheese is cold, it won't incorporate the sugar and egg yolk properly, leaving tiny white "pebbles" in your swirl. Next time, leave the block on the counter for at least two hours.
If you're in a rush, you can microwave it in 10 second bursts, but be careful not to actually melt it.
The mystery of the "oily" brownie surface
If you see a pool of oil on top of your brownies as they bake, the butter and sugar didn't emulsify properly. This happens if the eggs were added to butter that was too hot, or if the batter wasn't whisked enough during the egg stage.
The eggs act as the bridge between the fat and the liquid; if that bridge isn't built, the fat will separate and leak out.
| Problem | Root Cause | Solution |
|---|---|---|
| Sunken Center | Underbaked or oven door opened too early | Bake until a toothpick comes out with "moist crumbs," not wet batter. |
| Dry/Crumbly Texture | Too much flour or overbaked | Measure flour by spooning it into the cup; never pack it down. |
| Rubbery Cheesecake | Used egg white instead of just the yolk | Use only the yolk to keep the protein content lower and fats higher. |
Common Mistakes Checklist
- ✓ Always use "Dutch process" cocoa for that dark, Oreo matching flavor profile.
- ✓ Don't over swirl! Three or four "figure eights" is usually enough for a beautiful marble.
- ✓ Use the "parchment sling" method to avoid scratching your pans and ruining the edges.
- ✓ Let the brownies cool completely in the pan before lifting them out.
- ✓ Wipe your knife with a warm, damp cloth between every single cut for clean squares.
Adjusting the Yield for Any Crowd
Whether you’re baking for a solo treat or a large party, the math for these brownies is relatively straightforward. However, baking times change when you change the volume of batter in the pan.
Scaling Down (Making 8 Brownies) Cut all ingredients in half. Use a standard loaf pan instead of a square pan. Because the batter is deeper in a loaf pan, you may need to increase the bake time by about 5 minutes.
Use one whole egg and one egg yolk for the base to keep the structure sound.
Scaling Up (Making 32 Brownies) Double the ingredients and use a 9x13 inch (approx. 23x33 cm) rectangular baking pan. When doubling, don't double the salt use about 1.5x the original amount (3/4 tsp).
The baking time will likely stay around 40-45 minutes because the batter spread is similar in thickness to the original batch. Just watch the edges!
If you find yourself with extra cream cheese, you could even pivot and try The Lemon Lavender Cheesecake recipe for a completely different flavor profile next weekend.
Common Misconceptions About Brownie Baking
One of the biggest myths in the baking world is that a "clean toothpick" means the brownies are done. If the toothpick comes out completely dry, you have overbaked them. For fudgy brownies, you want "moist crumbs" clinging to the pick.
This indicates the center is set but still retains the moisture that makes them decadent.
Another myth is that you need baking powder for brownies. In this recipe, we rely entirely on the air whisked into the eggs for lift. Adding chemical leaveners like baking powder or soda would turn these into "cakey" brownies, which is the opposite of the dense, fudgy experience we’re building here.
We want weight, not fluff.
Preservation and Reducing Kitchen Waste
Storing these properly is the difference between a four day treat and a one day disappointment. Because of the cheesecake layer, these behave a bit differently than standard brownies.
- Storage: Keep these in an airtight container in the refrigerator. They will stay fresh for up to 5 days. The cold actually improves the texture of the cheesecake swirl, making it feel more like a decadent truffle.
- Freezing: These freeze beautifully! Wrap individual squares tightly in plastic wrap, then place them in a freezer bag. They’ll last for 3 months. Thaw in the fridge overnight before eating.
- Zero Waste: If you have "ugly" edge pieces or crumbs left over, don't throw them away. Crumble them up and use them as a topping for vanilla ice cream, or fold them into a batch of Fluffy Pancakes From recipe for a wild weekend breakfast. You can even blend the scraps into a milkshake for the ultimate Oreo overload experience.
Creative Ways To Serve Your Masterpiece
While these are incredible on their own, a few small touches can turn them into a plated dessert. I love serving a slightly chilled square with a tiny pinch of flaky sea salt on top it makes the chocolate flavor "pop" and cuts through the sweetness of the Oreo cream.
If you're feeling adventurous, try serving them "warm cold." Zap a brownie in the microwave for just 10 seconds enough to soften the chocolate but not melt the cheesecake and top it with a scoop of cold espresso bean ice cream. The temperature contrast is amazing.
For a party, you can cut them into tiny "bites" (about 2cm squares) and stick a toothpick in each. It makes them the perfect finger food that won't overwhelm people with too much sugar at once. Whatever you do, make sure you have a cold glass of milk nearby; these are "thirsty" brownies in the best way possible.

Recipe FAQs
Can I substitute block cream cheese with whipped cream cheese from a tub?
No, stick with the block form. Whipped versions contain significantly more water and stabilizers, which prevents the cheesecake layer from setting firmly during baking.
What is the correct internal doneness cue for fudgy brownies?
Look for moist crumbs clinging to a toothpick. If the toothpick comes out completely clean, the residual heat will continue to cook them, resulting in a dry or cakey texture.
How do I prevent the brownie batter from becoming too cakey?
Avoid overmixing after the flour is added. Mix only until streaks of dry ingredients disappear; overmixing develops gluten, which leads to unwanted lift and a cake like crumb structure.
How to achieve the distinct, shiny crackle top on these brownies?
Whisk the melted butter and sugar vigorously for two minutes before adding eggs. This initial step helps dissolve the sugar and creates the unstable sugar fat mixture needed for the signature glossy surface.
How long must I chill the brownies before attempting to slice them neatly?
Chill for at least two hours, or preferably overnight. Slicing while warm will cause the fudgy base and the cream cheese swirl to smear together, ruining the defined layers.
Is using Dutch process cocoa essential, or can I use natural cocoa powder?
Yes, Dutch process is strongly recommended for this recipe. Natural cocoa is acidic and will react with the baking soda (if used), whereas Dutch process provides a deeper, less sharp chocolate flavor profile, similar to store-bought Oreos.
How can I adapt this technique for a smaller pan size like 6x6 inches?
Reduce all ingredients by approximately 60% and reduce the bake time by 10 minutes. When working with smaller volumes in deeper pans, ensure you check the temperature frequently, similar to the technique required for precise baking in our make-ahead Breakfast recipe.
Easy Oreo Cheesecake Brownies
Ingredients:
Instructions:
Nutrition Facts:
| Calories | 312 kcal |
|---|---|
| Protein | 4.2 g |
| Fat | 17.3 g |
| Carbs | 38.1 g |
| Fiber | 1.8 g |
| Sugar | 28.4 g |
| Sodium | 184 mg |
