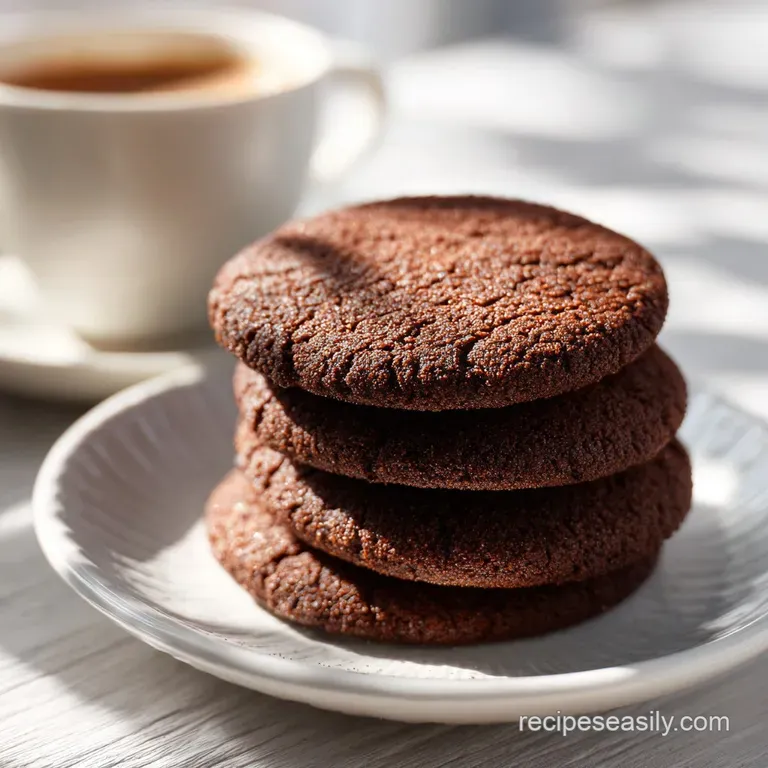
Soft Chocolate Sugar Cookies: Fudgy and Rich
- Time: Active 15 minutes, Passive 10 minutes, Total 25 minutes
- Flavor/Texture Hook: Fudgy, cocoa rich centers with a crackly, sparkling sugar crust
- Perfect for: Last minute bake sales, rainy afternoon cravings, or beginner bakers
- The Secret to Soft Chocolate Sugar Cookies
- Ingredient Deep Dive and Analysis
- Ingredients and Potential Substitutes
- Minimal Tools for Better Baking
- From Prep to Plate Instructions
- Avoiding Common Baking Disasters
- Creative Flavor Variations
- Scaling the Recipe for Crowds
- Kitchen Myths Debunked
- Storage and Leftover Tips
- Perfect Pairings and Complements
- Recipe FAQs
- 📝 Recipe Card
The Secret to Soft Chocolate Sugar Cookies
Picture this: it is 8:00 PM on a Tuesday, the rain is drumming against the window, and your kitchen is filled with the scent of toasted cocoa and warm butter. You pull a tray out of the oven, and the cookies are still sizzling slightly on the parchment paper.
You don't wait for them to cool completely before taking a bite, and the center is so tender it practically melts, while the sugar coating provides a satisfying little crunch. That is the magic of this specific recipe.
I used to think that to get a deep chocolate flavor, I had to melt expensive bars of chocolate or wait hours for dough to firm up in the fridge. I was wrong. I remember one frantic afternoon trying to prep for a school event when I realized I had zero time for "chilling." I tweaked my grandmother's old sugar cookie base, swapped in some heavy duty cocoa, and added a secret weapon for softness.
The result was better than the original.
These soft chocolate sugar cookies are the ultimate "quick win" because they rely on pantry staples and smart technique rather than fancy equipment. You get that velvety, brownie like interior without the fuss.
We are going for a texture that is substantial enough to hold its shape but soft enough that it feels like a treat from a high end boutique. Let's look at why this specific formula works so well.
Why the Cornstarch Stays In: Adding just a small amount of cornstarch interferes with the gluten strands in the flour, ensuring the crumb stays tender rather than tough or bread like.
The Dual Sugar Advantage: While white sugar provides the crisp edges and the crackle, the small amount of brown sugar brings moisture and a hint of molasses depth.
The Leavening Lift: Baking soda reacts with the acidic Dutch process cocoa to create immediate lift, which is why these don't need a long rest to puff up beautifully.
Butter Aeration Secrets: Beating the butter for a full three minutes creates tiny air pockets that expand in the heat, giving you that characteristic soft baked feel.
| Thickness | Internal Temp | Rest Time | Visual Cue |
|---|---|---|---|
| 1.5 cm | 85°C | 5 mins | Edges set, center looks slightly soft |
| 2 cm | 88°C | 8 mins | Top cracks are visible and matte |
| 1 cm | 82°C | 3 mins | Edges are firming, surface is bubbly |
When you are deciding how long to leave these in, remember that carryover cooking is your friend. If the cookie looks "done" in the middle while still in the oven, it will likely be overbaked and dry by the time it cools. You want to see the edges firm up while the cracks in the center still look a little moist.
This ensures that signature fudgy bite we all love.
Ingredient Deep Dive and Analysis
| Ingredient | Science Role | Pro Secret |
|---|---|---|
| Dutch process Cocoa | Provides color and deep flavor | Sift it twice to remove stubborn lumps |
| Unsalted Butter | Fat for tenderness and flavor | Use "cool" room temp, not greasy soft |
| Large Egg | Binds and provides structure | Room temperature eggs emulsify much faster |
Selecting the right cocoa is the most important choice you will make here. I always reach for Dutch process because it has been treated with an alkalizing agent to neutralize its natural acidity.
This makes the flavor smoother and the color much darker, which is what gives these cookies their professional, "black forest" look. If you use natural cocoa powder, the cookies will be lighter in color and have a slightly sharper, more citrusy bite.
Ingredients and Potential Substitutes
- 250g all purpose flour: The structure of our cookie.
- Substitute: 250g 1 to-1 gluten-free flour blend. Why this? Provides enough protein to hold the cookie together without being too heavy.
- 60g Dutch process cocoa powder: The source of our deep chocolate hit.
- Substitute: 60g natural cocoa powder (note: cookies will be lighter and tangier). Why this? Dutch process yields a darker color and a milder, fudgy flavor profile.
- 1 tablespoon cornstarch: Our "softness" insurance policy.
- Substitute: 1 tablespoon arrowroot powder. Why this? Weakens the flour's gluten for a more delicate, melt in-your mouth texture.
- 1 teaspoon baking soda: The lifting agent.
- Substitute: 3 teaspoons baking powder (though the texture will be cakier). Why this? Reacts with the cocoa to create a light, airy crumb structure.
- 0.5 teaspoon fine sea salt: Enhances the chocolate notes.
- Substitute: 0.5 teaspoon table salt. Why this? Salt balances the sugar and makes the cocoa flavor pop.
- 225g unsalted butter, softened: The fat base for flavor and moisture.
- Substitute: 225g vegan butter sticks (high fat content). Why this? high-quality butter provides the best mouthfeel and classic dairy flavor.
- 200g granulated white sugar: Creates the crisp edges and the coating.
- Substitute: 200g caster sugar for a finer texture. Why this? Essential for the "sugar cookie" snap and the crackled surface appearance.
- 55g light brown sugar, packed: Adds moisture and chew.
- Substitute: 55g dark brown sugar for a more intense molasses flavor. Why this? Brown sugar is hygroscopic, meaning it pulls moisture into the cookie.
- 1 large egg, room temperature: The binder.
- Substitute: 1 flax egg (1 tbsp ground flax + 3 tbsp water). Why this? Provides the necessary fat and protein to set the cookie's shape.
- 2 teaspoons pure vanilla extract: The flavor bridge.
- Substitute: 1 teaspoon almond extract (for a cherry chocolate vibe). Why this? Rounds out the bitterness of the cocoa and adds floral notes.
Minimal Tools for Better Baking
You don't need a kitchen full of gadgets to make these happen. In fact, I often find that using too many tools just leads to more cleanup and less time eating. A simple hand mixer or even a sturdy whisk and some elbow grease will get the job done. If you're feeling festive or looking for a different project, you might also enjoy making my Valentine Chocolate Chip Cookies which use a similar simple tool philosophy.
For this recipe, a standard baking sheet and some parchment paper are your best friends. The parchment ensures that the sugar coating doesn't stick to the pan and burn. If you don't have a cookie scoop, don't sweat it. Two large spoons or just your hands will work perfectly well.
The goal here is efficiency and deliciousness, not perfection in shape.
From Prep to Plate Instructions
- Heat the oven. Set your oven to 180°C (350°F) and line two large baking sheets with parchment paper. Note: Preheating is vital so the cookies puff up immediately when they hit the heat.
- Cream the fats and sugars. In a large bowl, combine the 225g softened butter, 200g granulated sugar, and 55g brown sugar. Beat for 3 minutes until the mixture is pale and aerated.
- Incorporate the liquids. Add the large egg and 2 teaspoons of vanilla extract. Continue beating until the texture resembles thick buttercream.
- Sift the dry ingredients. In a separate bowl, sift the 250g flour, 60g cocoa powder, 1 tablespoon cornstarch, 1 teaspoon baking soda, and 0.5 teaspoon salt. Note: Sifting is non negotiable for cocoa powder as it loves to clump.
- Combine the mixtures. Turn your mixer to the lowest setting and slowly add the dry ingredients to the butter mixture. Stop mixing the moment no white streaks remain.
- Shape the dough. Scoop rounded tablespoons of dough, about 30g each. Roll the dough between your palms until you have a smooth, round ball.
- Apply the coating. Toss each dough ball in the extra 50g of granulated sugar until completely and thickly covered.
- Arrange for baking. Place the balls on the prepared sheets, leaving about 5 cm of space between them.
- Bake for precision. Bake for 10 minutes until the edges are set and the tops have crackled.
- Cool and set. Let the cookies rest on the hot pan for 5 minutes before moving them to a wire rack. Note: This allows the center to finish setting through carryover heat.
Avoiding Common Baking Disasters

Why Your Cookies Spread Too Much
If your cookies come out looking like thin pancakes rather than pillowy treats, the culprit is usually the butter temperature. If the butter is too warm (almost melting) when you start creaming, it won't hold those tiny air pockets.
Another common issue is "over creaming," where you beat so much air into the butter that the structure collapses in the oven.
| Problem | Root Cause | Solution |
|---|---|---|
| Flat Cookies | Butter was too soft or greasy | Chill dough for 15 mins before baking |
| Dry/Crumbly | Too much flour or overbaked | Use a scale; check oven at 8 minutes |
| Tough Texture | Overworked the gluten | Mix dry ingredients by hand, just until combined |
Another factor to consider is the temperature of your baking sheet. I once made the mistake of placing a second batch of dough onto a hot pan that had just come out of the oven. The bottoms of the cookies started melting before they even hit the oven heat, leading to massive spreading.
Always let your pans cool down between batches, or run them under cold water and dry them thoroughly.
Common Mistakes Checklist
- ✓ Use a kitchen scale for the flour and cocoa (measuring by volume is often inaccurate)
- ✓ Ensure the egg is at room temperature so the fat doesn't seize
- ✓ Sift the cocoa powder to avoid bitter, dry lumps in the finished cookie
- ✓ Don't skip the cornstarch - it's the key to the "soft" in soft chocolate sugar cookies
- ✓ Give the cookies space on the tray; they need room to breathe and crackle
Creative Flavor Variations
If you are a fan of different textures, you can easily adapt this base. For example, if you love a bit of fruitiness, you could take inspiration from my Strawberry Kiss Cookies and add a small indentation in the center of these chocolate balls before baking, then fill it with raspberry jam.
Infusing Mexican Hot Chocolate
To give these a spicy kick, add 1 teaspoon of ground cinnamon and a tiny pinch of cayenne pepper to the dry ingredients. The heat from the pepper amplifies the richness of the cocoa, creating a sophisticated flavor profile that is perfect for cold weather.
You can even roll them in a mixture of sugar and cinnamon for extra warmth.
Adding the Double Chocolate Punch
While the base is plenty chocolatey, sometimes you just want more. Fold in 100g of mini semi sweet chocolate chips or chopped white chocolate right at the end of the mixing process. This adds "pockets" of melted chocolate that contrast beautifully with the soft crumb.
It makes the cookie feel even more like a brownie in disguise.
Creating a gluten-free Alternative
This recipe actually converts to gluten-free quite well. Because it relies on cocoa and cornstarch for a lot of its bulk, swapping the 250g of all purpose flour for a high-quality gluten-free 1 to-1 blend (the kind with xanthan gum already included) works seamlessly.
The cookies might be slightly more fragile when warm, so give them an extra 5 minutes of cooling time on the pan.
Scaling the Recipe for Crowds
Scaling this recipe up for a party is simple, but there are a few things to keep in mind. If you are doubling the batch to 48 cookies, you will need 500g of flour and 120g of cocoa. I recommend using two separate bowls for the dry ingredients if your stand mixer is on the smaller side.
When doubling, try to use two large eggs rather than one jumbo egg to keep the moisture levels consistent.
If you are scaling down to just 12 cookies, things get a bit trickier because of the egg. The best way to do this is to crack the egg into a small bowl, whisk it well, and then use exactly half of it by weight (about 25g). This ensures you don't end up with a dough that is too wet or too cakey.
For a smaller batch, keep a close eye on the bake time, as a smaller amount of dough in a smaller oven can sometimes cook a minute or two faster.
Kitchen Myths Debunked
Many people believe that you must chill every cookie dough for at least 24 hours to develop flavor. While that is true for some recipes, it isn't a hard rule for these. Because we are using Dutch process cocoa and a high amount of sugar, the flavor is already intense.
Chilling this specific dough for too long can actually make it quite stiff and difficult to roll in the sugar coating.
Another common myth is that "soft" cookies are underbaked. In reality, softness comes from the ingredient ratios specifically the cornstarch and the brown sugar. You can bake these until they are fully set and safe to eat, and they will still remain tender.
The "softness" is a result of moisture retention and inhibited gluten, not raw flour.
Storage and Leftover Tips
To keep these cookies in peak condition, store them in an airtight container at room temperature for up to 5 days. If you find they are starting to firm up more than you like, tuck a single slice of plain white bread into the container.
The cookies will absorb the moisture from the bread, staying soft for an extra day or two. It is a classic trick that works every time.
For longer storage, these cookies freeze beautifully. You can freeze the baked cookies for up to 3 months just make sure they are completely cool before placing them in a freezer bag. You can also freeze the raw dough balls (after rolling them in sugar).
When you're ready for a treat, just bake them directly from frozen, adding about 2 minutes to the total bake time. For zero waste, save any leftover coating sugar to sprinkle over your morning oatmeal or to use in your next batch of brownies.
Perfect Pairings and Complements
These cookies are quite rich, so they pair best with something that offers a bit of contrast. A cold glass of whole milk is the traditional choice, but a hot cup of black coffee or a strong Earl Grey tea works wonders to cut through the sweetness.
If you're serving these as a dessert, try crumbling one over a bowl of high-quality vanilla bean ice cream.
If you are putting together a dessert platter, these look stunning next to lighter colored treats. The deep black brown of the cocoa and the sparkling sugar crust provide a beautiful visual contrast to fruit based desserts or simple butter cookies.
They are the perfect "anchor" for a holiday tray because they appeal to the chocolate lovers and the sugar cookie fans alike.

Recipe FAQs
Why is my dough too dry to roll into balls?
You likely measured by volume instead of weight. Using a kitchen scale is essential to prevent the flour and cocoa powder from packing down and drying out your dough.
How to achieve the perfect crackled top?
Roll the dough balls thoroughly in the extra granulated sugar before baking. If you enjoyed mastering this specific texture technique, see how we use similar structural principles to create the perfect finish on other cookies.
Is it true I can use cold butter to save time?
No, this is a common misconception. You must use softened butter to ensure it aerates properly with the sugars during the three minute mixing phase.
How to keep these cookies soft for longer?
Place a slice of white bread in the airtight storage container. The cookies will pull moisture from the bread, maintaining their soft texture for several extra days.
Can I skip the cornstarch?
No, the cornstarch is strictly required. It is the secret ingredient that gives these cookies their signature soft, tender crumb.
How to prevent bitter lumps in the cookies?
Sift the Dutch process cocoa powder before adding it to the bowl. This simple step removes compacted clumps that would otherwise create unpleasant bitter spots in your finished dessert.
Should I over mix the dough to ensure it is smooth?
No, never over mix once the dry ingredients are added. Stop the mixer the moment the white streaks disappear to avoid overworking the gluten, which would result in a tough rather than soft cookie.
Soft Chocolate Sugar Cookies

Ingredients:
Instructions:
Nutrition Facts:
| Calories | 164 kcal |
|---|---|
| Protein | 1.9 g |
| Fat | 8.2 g |
| Carbs | 22.4 g |
| Fiber | 1.1 g |
| Sugar | 13.2 g |
| Sodium | 98 mg |
