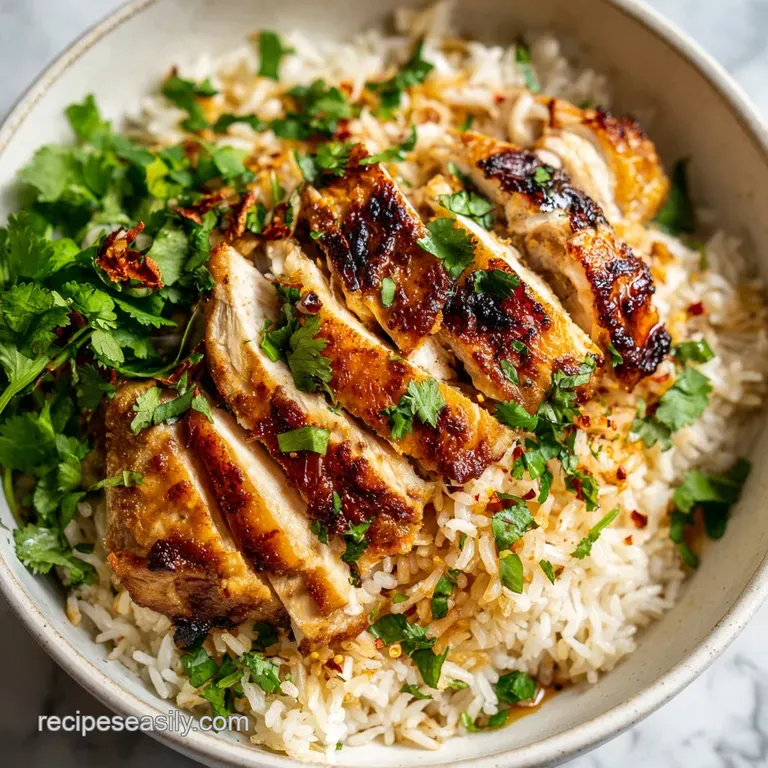
One Pot Chicken and Rice: Savory and Seared
- Time: Active 15 minutes, Passive 25 minutes, Total 40 minutes
- Flavor/Texture Hook: Savory, toasted grains with mahogany seared chicken
- Perfect for: Stress free weeknight dinners and reliable meal prepping
- The Essential Comfort Found in This Recipe with Chicken and Rice
- Why This Savory One Pot Method Works
- Component Analysis and Flavor Science
- Essential Ingredients and Smart Substitutions
- Necessary Kitchen Tools
- The Sequential Cooking Process
- Troubleshooting Common Issues
- Adjusting for Different Needs
- Debunking Common Kitchen Myths
- Preservation and Zero Waste Secrets
- Creative Serving and Pairing Ideas
- Recipe FAQs
- 📝 Recipe Card
The Essential Comfort Found in This Recipe with Chicken and Rice
Have you ever wondered why some chicken and rice dishes feel like a warm, cozy hug while others just taste like soggy, uninspired cardboard? It is a question that haunted my kitchen for months until I realized the secret is not in the ingredients themselves, but in how they interact with the bottom of the pan.
There is something truly magical about the way 1.5 lbs chicken thighs, boneless/skinless, transform when they hit a hot surface, releasing that incredible aroma of smoked paprika and garlic. That scent fills the house and immediately tells everyone that dinner is going to be something special tonight.
This specific method is all about building layers. We are not just boiling things together, we are creating a foundation of flavor that starts with a hard sear and ends with perfectly fluffy grains.
I remember the first time I got this right, the rice was separate and tender, not a clump in sight, and the chicken had this beautiful, dark crust that looked like it came from a professional kitchen. It changed the way I looked at "simple" meals forever.
You do not need a dozen pans or a culinary degree to pull this off, just a bit of patience during the searing phase.
What you can expect here is a straightforward, honest meal that delivers on every promise. We are going to use 1.5 cups long grain white rice and 2.5 cups low sodium chicken broth to ensure the ratios are spot on. No more guessing if the rice will be crunchy or if the pot will turn into a soup.
This is the version I make when I’m tired but still want to eat something that tastes like I spent hours at the stove. It is reliable, it is fast, and it is honestly the only way I make chicken and rice anymore.
Why This Savory One Pot Method Works
Understanding the "why" behind your cooking helps you move from just following instructions to actually knowing how to cook. It is like having a secret map of the kitchen. Here is the logic behind why these specific steps create such a standout result:
- Starch Transformation: By toasting the 1.5 cups long grain white rice in the butter and oil before adding liquid, you are essentially "par cooking" the exterior of each grain. This prevents the starches from rushing out and turning your dinner into a gummy mess.
- The Power of Fond: Those little brown bits stuck to the bottom of the Dutch oven after searing the chicken are concentrated flavor bombs. When you add the broth and scrape them up, you are infusing every single grain of rice with deep, roasted meat notes.
- Fat Soluble Spice Release: Searing the chicken with 1 tsp smoked paprika and 1 tsp garlic powder allows the heat and oil to bloom the spices. This makes the flavors more vibrant and ensures they permeate the entire dish rather than just sitting on the surface.
- Controlled Evaporation: Using a tight fitting lid during the 15-18 minutes of simmering creates a closed environment. This ensures the 2.5 cups low sodium chicken broth is absorbed evenly, steaming the rice to perfection while keeping the chicken juicy.
| Cooking Method | Cook Time | Final Texture | Best For |
|---|---|---|---|
| Stovetop (This Recipe) | 25 minutes | Tender rice, seared crust | Maximum flavor and one pot ease |
| Oven Baked | 45 minutes | Uniformly soft, fluffy | Hands off cooking for large crowds |
| Instant Pot | 10 minutes | Very soft, almost creamy | Last minute emergencies only |
The choice of method really depends on how much you value that seared crust on the chicken. While the oven is great for consistency, nothing beats the stovetop for developing that deep, mahogany colored fond that makes the rice taste so incredible.
It is the difference between a "good" meal and one that people ask for seconds of.
Component Analysis and Flavor Science
When we look at the individual pieces of this recipe, we can see how they each play a specific role in the final architecture of the dish. It is not just about filling the pot, it is about selecting elements that balance each other out.
| Ingredient | Science Role | Pro Secret |
|---|---|---|
| Avocado Oil | High Smoke Point | Allows for a hard sear on the chicken without the oil breaking down or smoking. |
| Long Grain Rice | Amylose Content | Higher amylose means the grains stay separate and fluffy rather than sticking together. |
| Smoked Paprika | Phenolic Compounds | Adds a "charred" depth that mimics wood fired cooking even on a standard stovetop. |
Each of these choices is deliberate. For instance, using 2 tbsp avocado oil instead of butter for the initial sear is vital because butter would burn at the temperatures needed to get that 4–5 minutes per side mahogany crust.
We save the 1 tbsp salted butter for the aromatics later, where its lower smoke point won't be an issue but its flavor can really shine.
Essential Ingredients and Smart Substitutions
To make this recipe work, you want to stick as closely to the ratios as possible. However, I know life happens and sometimes the pantry is bare. Here is what you will need and how you can pivot if necessary.
- Chicken Thighs (1.5 lbs): These are non negotiable for the best flavor. They stay juicy under the lid. Why this? Thighs have enough fat to withstand the simmer without becoming stringy or dry.
- Substitute: Chicken drumsticks (same weight). They take slightly longer but offer similar moisture.
- Long Grain White Rice (1.5 cups): This is the backbone of the dish. Why this? It absorbs liquid predictably and maintains a distinct structure when cooked.
- Substitute: Jasmine rice. It is slightly stickier but adds a beautiful floral aroma.
- Low Sodium Chicken Broth (2.5 cups): This provides the liquid base. Why this? Controlling the salt yourself prevents the final dish from being overly salty.
- Substitute: Water with a bouillon cube. Just be careful with the extra salt in the cube.
- Smoked Paprika (1 tsp): Provides color and earthiness. Why this? It creates that "burnt orange" visual that makes the dish look appetizing.
- Substitute: Sweet paprika with a pinch of cumin for a similar earthy depth.
- Avocado Oil (2 tbsp): The searing medium. Why this? It has a neutral flavor and can handle the high heat of the initial sear.
- Substitute: Grapeseed oil or any over high heat vegetable oil.
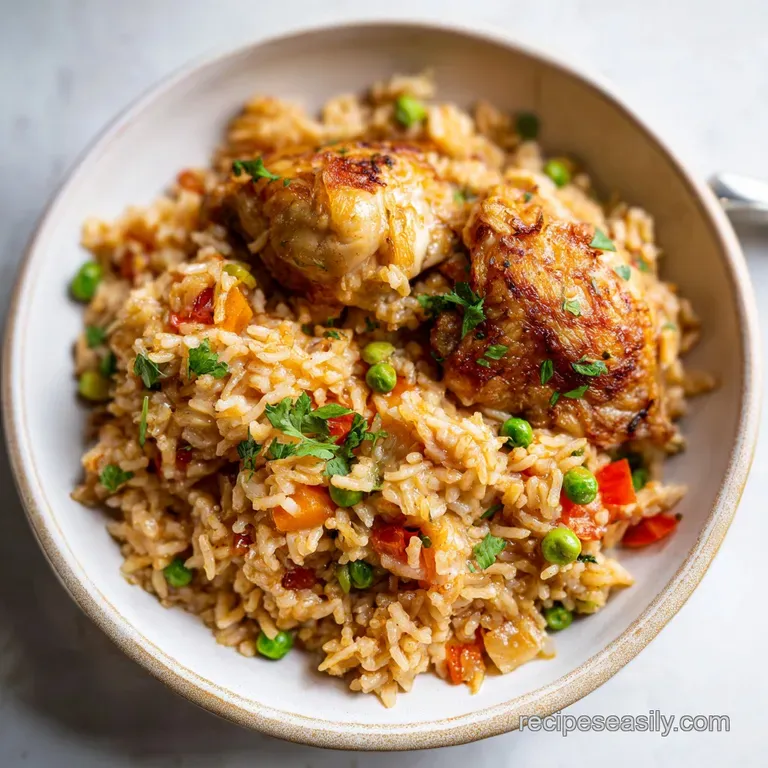
- Frozen Peas and Carrots (1 cup): For sweetness and color. Why this? They cook instantly in the residual heat and stay vibrant.
- Substitute: Finely chopped bell peppers or fresh spinach added at the very end.
Necessary Kitchen Tools
You don't need a pantry full of gadgets for this. In fact, keeping the toolset minimal is part of the charm of this one pot wonder.
- Dutch Oven: A heavy bottomed pot like a Lodge or Le Creuset is best. It holds heat evenly, which is critical for that 15-18 minutes of over low heat simmering. If you don't have one, a deep stainless steel skillet with a very tight lid will work.
- Wooden Spoon: You need something sturdy to scrape that fond off the bottom of the pot. Metal spoons can sometimes scratch enameled surfaces, so wood is the safe and effective choice.
- Paper Towels: These are actually a tool here. Patting the 1.5 lbs chicken thighs completely dry is the only way to ensure they sear instead of steam.
- Fine Mesh Strainer: Use this to rinse your rice. Rinsing removes excess surface starch, which is another insurance policy against mushy rice.
The Sequential Cooking Process
Follow these steps closely to ensure your chicken is juicy and your rice is perfectly textured. The timing here is calibrated for a standard stovetop.
- Prep the protein. Pat the 1.5 lbs chicken thighs completely dry with paper towels. Season both sides evenly with 1 tsp smoked paprika, 1 tsp garlic powder, 0.5 tsp sea salt, and 0.25 tsp cracked black pepper. Note: Dry skin/meat equals a better crust.
- Sear the chicken. Heat 2 tbsp avocado oil in your Dutch oven over medium high heat. Sear the chicken for 4–5 minutes per side until a deep, mahogany colored crust (fond) develops. Remove chicken to a plate.
- Sauté aromatics. Reduce heat to medium. Add 1 tbsp salted butter and 1 small yellow onion, finely diced. Use your wooden spoon to scrape those flavorful brown bits from the bottom. Sauté until the onion is translucent and soft.
- Toast the rice. Add 3 cloves minced garlic and 1.5 cups long grain white rice. Toast the rice for 1-2 minutes until grains are coated in fat and slightly translucent at the edges.
- Combine liquids. Pour in 2.5 cups low sodium chicken broth and stir in 1 cup frozen peas and carrots.
- Return chicken. Place the chicken and any resting juices back into the pot, nestling them into the rice.
- Simmer and cover. Bring the mixture to a gentle simmer, then cover with a tight fitting lid.
- The final cook. Reduce heat to low and cook for 15-18 minutes until the liquid is absorbed and the rice is tender.
- Resting period. Remove from heat and let it rest, covered, for 5 minutes. Note: This allows the steam to finish the rice perfectly.
- Garnish. Sprinkle with 1 tbsp fresh parsley and serve immediately.
Troubleshooting Common Issues
Even the best cooks run into trouble sometimes. The most common issues with this dish usually involve the texture of the rice or the color of the chicken.
Why Your Rice is Crunchy
If you open the lid after 18 minutes and the rice is still hard, it usually means the lid wasn't tight enough and the steam escaped. It could also mean the heat was a bit too low, preventing the liquid from fully penetrating the grain.
| Problem | Root Cause | Solution |
|---|---|---|
| Crunchy Rice | Steam loss or low heat | Add 2 tbsp broth, cover tightly, and cook for 5 more minutes on low. |
| Mushy Rice | Too much liquid or over stirring | Use exactly 2.5 cups broth and do not stir once the lid goes on. |
| Burnt Bottom | Heat was too high | Ensure the "low" setting is actually low. Use a heat diffuser if your stove runs hot. |
Why Your Chicken Lacks Color
If your chicken looks pale and gray, it is almost always because the meat was wet when it hit the oil or the pan wasn't hot enough. Moisture is the enemy of a good sear because it creates a layer of steam between the meat and the metal.
Common Mistakes Checklist
- ✓ Pat chicken completely dry before seasoning (this is the most important step for color).
- ✓ Wait for the oil to shimmer before adding the chicken to the pot.
- ✓ Do not move the chicken for the first 4 minutes; let the crust form naturally.
- ✓ Rinse the rice until the water runs clear to prevent a gummy texture.
- ✓ Keep the lid on! Every time you peek, you lose valuable steam and heat.
Adjusting for Different Needs
If you need to feed a crowd or just yourself, the ratios are easy to move around. Just remember that rice and water ratios are not always perfectly linear when you scale up significantly.
- Cutting in half: Use 0.75 lbs chicken and 0.75 cups rice. Use a smaller pot so the liquid depth remains sufficient. Reduce the 15-18 minute cook time by about 3 minutes, but check for tenderness early.
- Doubling the batch: Use 3 lbs chicken and 3 cups rice. You will likely need to sear the chicken in two batches to avoid overcrowding the pan. Increase the 2.5 cups broth to 4.75 cups (slightly less than double) to account for reduced evaporation in a larger pot.
- Low Carb "Rice" Alternative: If you want to swap the rice for cauliflower rice, do not add the 2.5 cups of broth. Sauté the cauliflower rice for only 5 minutes with the seared chicken on top. The texture will be different, but the flavors will still be there. For another perspective on light meals, you might enjoy these Healthy chicken bowls.
Debunking Common Kitchen Myths
There are a lot of old wives' tales about chicken and rice that simply do not hold up under the light of modern kitchen science.
- Searing seals in juices: This is not true. Searing creates flavor through the Maillard reaction, but it does not create a waterproof barrier. The reason we sear here is strictly for the taste and the fond it leaves behind for the rice.
- You must boil the water first: Some people think you need to bring the broth to a boil before adding the rice. In a one pot dish like this, starting from a cool or room temperature broth allows the rice to hydrate more evenly as the temperature rises.
- Rinsing rice removes all the nutrients: While it does remove some surface enrichment, the culinary benefit of having separate, fluffy grains far outweighs the microscopic loss of vitamins. If you want fluff, you must rinse.
Preservation and Zero Waste Secrets
One of the best things about this meal is that it actually tastes better the next day. The flavors have more time to mingle and the rice firms up just enough to have a great "bite."
- Fridge
- Store in an airtight container for up to 4 days. The rice will absorb more moisture as it sits, so it might be slightly softer on day three.
- Freezer
- This dish freezes surprisingly well. Place portions in freezer safe bags for up to 3 months. To reheat, thaw in the fridge overnight.
- Reheating
- Add a splash of water or broth before microwaving or heating on the stove. This creates a bit of steam that prevents the rice from drying out and turning into little pebbles.
Zero Waste Tips Don't throw away the parsley stems! Finely mince them and add them into the pot with the garlic and rice for an extra hit of herbal flavor. If you have leftover chicken bones from a different meal, you can simmer them in water to make a quick "scrap broth" to use instead of the store-bought version.
Even the onion skins can be saved in a freezer bag for the next time you make a full batch of homemade stock.
Creative Serving and Pairing Ideas
While this is a complete meal on its own, adding a little something on the side can make it feel like a feast. Since this is a savory, earthy dish, I usually go for something bright or creamy to balance it out.
A crisp green salad with a sharp lemon vinaigrette is the perfect counterpoint to the richness of the chicken thighs and buttery rice. The acidity cuts right through the fat and cleanses your palate between bites. If you are looking for something heartier, this Broccoli Casserole recipe makes a fantastic companion, especially if you want to lean into that "comfort food" vibe.
For a bit of crunch, try topping the finished dish with toasted almonds or even some crispy fried onions. It adds a textural contrast that makes every forkful more interesting. If you like heat, a drizzle of chili crunch or a few dashes of your favorite hot sauce can really wake up the smoked paprika and garlic notes.
Regardless of how you serve it, the core of this chicken and rice dinner remains a testament to the fact that simple techniques, done well, produce the most satisfying results.

Recipe FAQs
What can I make with chicken and rice easily?
This one-pot chicken and rice is the most efficient choice. By cooking everything in one Dutch oven, you minimize cleanup while ensuring the rice absorbs all the savory pan drippings.
What can go with chicken and rice?
Keep sides light to balance the richness. A simple green salad or steamed vegetables pair best, as this dish is already a hearty, self contained meal.
What is a good way to flavor up some chicken and rice?
Prioritize the sear on your chicken. Developing a deep brown crust, or fond, on the bottom of your pot creates the flavor foundation that seasoning alone cannot replicate.
What are the 4 ingredients in chicken and rice casserole?
This recipe relies on chicken thighs, long grain white rice, chicken broth, and frozen peas and carrots. While other aromatics like onion and garlic build depth, these four serve as the primary structural components.
How to ensure the chicken skin gets crispy?
Pat your chicken thighs completely dry with paper towels before seasoning. Excess surface moisture creates steam instead of the high heat sear needed for a mahogany colored crust.
Is it true I must rinse the rice to prevent it from getting mushy?
No, this is a common misconception for this specific method. Toasting the dry rice in fat for 1-2 minutes until the edges are translucent creates a protective barrier that keeps individual grains distinct.
How to avoid burning the fond when sautéing onions?
Deglaze the pot by adding butter and onions immediately after removing the chicken. If you enjoyed using this fond development technique to concentrate flavor, you can apply the same principle to elevate the base of any braised dish.
One Pot Chicken And Rice

Ingredients:
Instructions:
Nutrition Facts:
| Calories | 729 kcal |
|---|---|
| Protein | 38.5 g |
| Fat | 35.4 g |
| Carbs | 59.2 g |
| Fiber | 2.8 g |
| Sugar | 2.1 g |
| Sodium | 628 mg |
