Red Velvet Cookies with Cream Cheese Filling
- Time:15 minutes active + 60 minutes chilling = Total 1 hours 55 mins
- Flavor/Texture Hook: Velvety, tangy center with a soft, cocoa scented crumb
- Perfect for: Valentine's Day, bridal showers, or a fancy dessert platter
- Red Velvet Cookies Recipe with Cream Cheese Filling
- The Secret to the Texture
- Component Analysis
- Gathering Your Essentials
- Tools for the Job
- The Cooking Process
- Fix Common Baking Issues
- Customizing Your Cookies
- Adjusting Batch Sizes
- Common Baking Misconceptions
- Storage Guidelines
- Serving Suggestions
- Recipe FAQs
- 📝 Recipe Card
The scent of cocoa and a hint of vanilla always brings me back to my aunt's kitchen in Georgia. Red velvet isn't just a color, it's a cultural staple of the American South, representing a time when cocoa was a luxury and the reaction between vinegar and cocoa powder created that signature reddish tint.
It's more than a cake; it's a celebration of warmth and family gatherings.
This is the ultimate Red Velvet Cookies Recipe with Cream Cheese Filling. I remember the first time I tried to stuff a cookie, and the filling just leaked out, leaving me with a red puddle on my baking sheet.
After a few tweaks to the temperature and timing, I realized the secret isn't in the dough, but in the state of the filling.
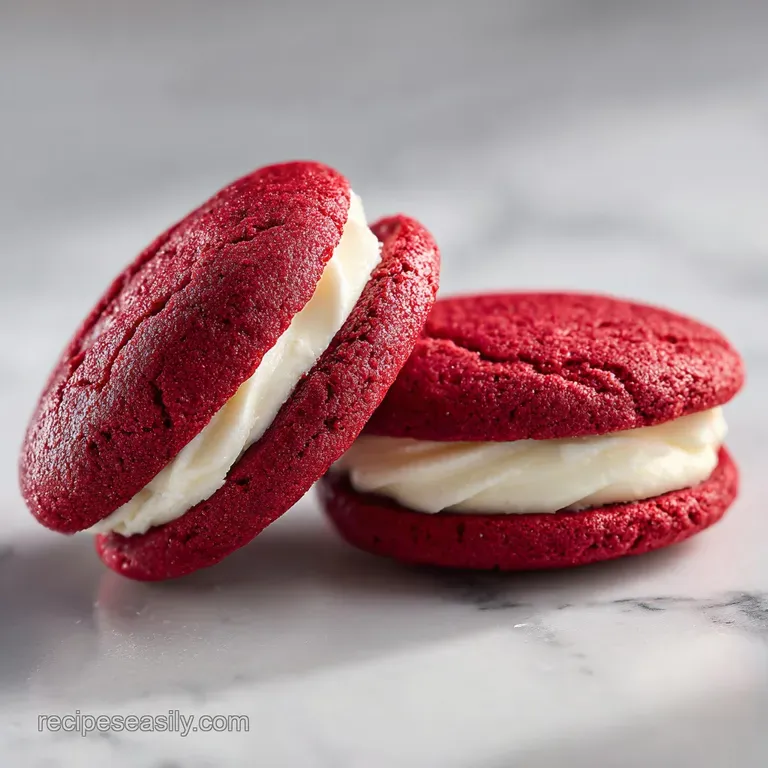
You can expect a cookie that has a slight tang, a soft chew, and a burst of creamy sweetness in the middle. We're skipping the fancy equipment here, focusing on a few bowls and a mixer to get a result that looks like it came from a professional bakery but feels like home.
Red Velvet Cookies Recipe with Cream Cheese Filling
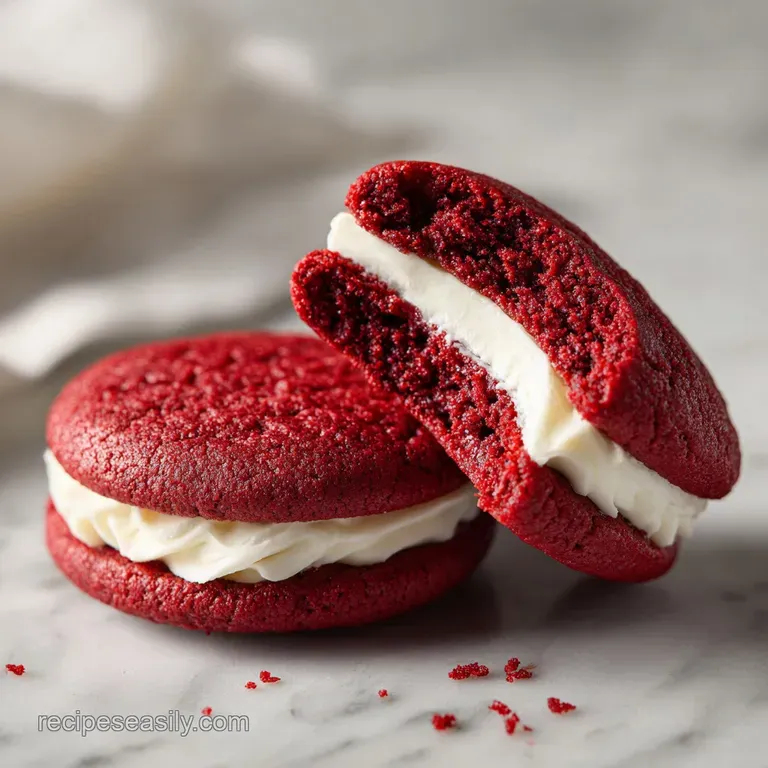
I've always found that the magic of this dish lies in the contrast. You have the deep, earthy notes of the cocoa powder playing against the bright, acidic punch of the cream cheese. When you bite into one, the exterior should be soft, almost like a fudgy brownie, while the center remains a silky, cool surprise.
Many people overbake these because they're worried the center is raw, but that's the trap. If you wait until the cookies look "done" on top, you've overbaked the filling. The goal is a slight under bake that sets perfectly as they cool on the pan. Trust the timer, not just your eyes.
I once tried making these with liquid food coloring instead of gel, and the dough became so runny I had to add more flour, which ruined the texture. It turned into a brick. Now, I only ever use gel coloring because it gives that vibrant crimson without messing with the hydration of the dough.
The Secret to the Texture
To get that specific "velvet" feel, there are a few things happening behind the scenes that make the difference between a standard chocolate cookie and this recipe.
- Acid Base Balance: The cocoa powder and lemon juice react with the baking soda to create tiny air bubbles, giving the cookie its characteristic softness.
- Core Stabilization: Freezing the cream cheese balls prevents the fat from melting too quickly, which keeps the filling centered instead of leaking.
- Sugar Crystallization: Creaming the butter and sugar for a full few minutes incorporates air, ensuring the cookie doesn't turn into a flat pancake.
- Temperature Control: Chilling the dough slows down the spread, allowing the edges to set before the middle fully melts.
| Method | Time | Texture | Best For |
|---|---|---|---|
| Fast Method | 30 mins | Softer, more spread | Quick cravings |
| Classic Method | 1 hours 55 mins | Thick, structured | Gifting/Parties |
Component Analysis
Understanding what each part does helps you fix things if they go wrong. Here is a breakdown of the heavy hitters in this dough.
| Ingredient | Science Role | Pro Secret |
|---|---|---|
| Cocoa Powder | Flavor and Acid | Use Dutch processed for a deeper color |
| Red Gel Color | Visual Appeal | Add it to the wet ingredients for even distribution |
| Cream Cheese | Tangy Center | Must be full fat to avoid watery filling |
| Baking Soda | Lift and Texture | Sift it with flour to avoid bitter clumps |
Gathering Your Essentials
Right then, let's get the ingredients ready. I highly recommend taking your butter and eggs out of the fridge an hour before you start. Cold butter won't cream properly, and cold eggs can cause the batter to curdle.
For the Red Velvet Dough:
- 1/2 cup (115g) unsalted butter, softenedWhy this? Provides the fat for a tender crumb
- 3/4 cup (150g) granulated sugarWhy this? Creates the structure and sweetness
- 1 large egg (50g), room temperatureWhy this? Binds the dough and adds richness
- 1 tsp (5ml) vanilla extractWhy this? Rounds out the cocoa flavor
- 2 tsp (10ml) red gel food coloringWhy this? Intense color without extra liquid
- 2 cups (250g) all purpose flourWhy this? Standard protein for a soft chew
- 2 tbsp (15g) unsweetened cocoa powderWhy this? Gives the red velvet base flavor
- 1 tsp (5g) baking sodaWhy this? Reacts with acid for lift
- 1/4 tsp (1.5g) saltWhy this? Balances the sugar
For the Cream Cheese Filling:
- 4 oz (115g) full fat cream cheese, softenedWhy this? Stabilizes the filling
- 1/4 cup (30g) powdered sugarWhy this? Sweetens without adding grit
- 1/4 tsp (1.25ml) vanilla extractWhy this? Enhances the creaminess
- 1/4 tsp (1.25ml) lemon juiceWhy this? Adds a bright, zesty note
| Original Ingredient | Substitute | Why It Works |
|---|---|---|
| All Purpose Flour | Almond Flour | Grain free. Note: Denser crumb and more fragile |
| Granulated Sugar | Coconut Sugar | Lower glycemic. Note: Darkens the red color |
| Full fat Cream Cheese | Mascarpone | Creamier texture. Note: Less tangy than cream cheese |
Tools for the Job
You don't need a professional kitchen for this. A simple setup will do. I use a stand mixer such as KitchenAid, but a hand mixer works just as well.
- Large mixing bowl (for wet ingredients)
- Medium mixing bowl (for dry ingredients)
- Electric mixer
- Sifter or fine mesh strainer
- Baking sheets
- Parchment paper (don't skip this, or you'll be scrubbing pans for an hour)
- Small cookie scoop or tablespoons
The Cooking Process
Let's crack on. The most important part here is the sequence. We have to get the filling frozen before we even think about the dough.
Phase 1: Prepping the Cream Cheese Core
- Whisk together the cream cheese, powdered sugar, vanilla extract, and lemon juice. Mix until the texture is velvety and no lumps remain.
- Drop 12 small teaspoons of the cream cheese mixture onto a parchment lined tray. Note: Keep them uniform in size so they bake evenly.
- Freeze for at least 60 minutes until hard to the touch.
Phase 2: Mixing the Velvet Base
- Cream the softened butter and granulated sugar using a mixer. Beat for about 3 minutes until the mixture is pale and fluffy.
- Beat in the egg, vanilla extract, and red gel food coloring. Mix until the color is uniform and vibrant.
- In a separate bowl, sift together the all purpose flour, cocoa powder, baking soda, and salt. Note: Sifting is key to avoid white streaks of flour in your red cookies.
- Gradually fold the dry ingredients into the wet mixture. Do this slowly until a soft crimson dough forms.
- Chill the dough in the refrigerator for 30 minutes. Note: This prevents the cookies from flattening too much in the oven.
Phase 3: Stuffing and Baking
- Preheat the oven to 350°F (175°C).
- Scoop approximately 2 tablespoons of dough. Flatten it into a disc in your palm.
- Place one frozen cream cheese ball in the center. Wrap the dough around it and roll it into a ball, ensuring there are no cracks in the seal.
- Bake for 10 minutes until the edges are set but the centers still look slightly soft.
Chef's Note: If you notice the cookies are spreading too fast, put the tray in the freezer for 5 minutes right before they go into the oven. It's a lifesaver.
Fix Common Baking Issues
Even the best of us hit a snag. If your cookies aren't looking right, it's usually a temperature issue.
Causes for Cookie Spread
If your cookies look more like pancakes than plump mounds, your butter was likely too warm or you skipped the dough chill. When butter is too soft, it melts instantly in the oven before the flour can set.
Filling Leakage Problems
The "volcano" effect happens when the filling isn't frozen solid or the dough seal was too thin. Make sure the dough completely envelops the cheese ball with no gaps.
Color Fading Issues
Red velvet can turn brown if the oven is too hot or if you use liquid coloring that reacts with the cocoa. Stick to gel colors and keep the temp at 175°C.
| Problem | Root Cause | Solution |
|---|---|---|
| Cookies are flat | Butter too soft | Chill dough for 30 mins |
| Filling leaked | Core not frozen | Freeze filling for full 60 mins |
| Dull red color | Liquid dye used | Switch to gel food coloring |
Baking Success Checklist
- ✓ Butter is "cool room temperature" (indents but doesn't ooze)
- ✓ Cream cheese cores are rock hard before stuffing
- ✓ Dough was chilled for at least 30 minutes
- ✓ Oven is preheated to exactly 175°C
- ✓ Cookies are removed while centers still look slightly underdone
Customizing Your Cookies
If you're feeling adventurous, you can tweak this recipe to suit your mood. For those who love a more complex dessert, you might enjoy these Cookie Dough Cheesecake Bars, which share a similar flavor profile but have a completely different texture.
Adding a Chocolate Twist For a deeper chocolate flavor, you can add 1/2 cup of mini chocolate chips to the dough. This adds a bit of "crunch" to the otherwise soft experience. Just fold them in at the very end.
Creating a Crinkle Look If you want that classic red velvet crinkle look, roll the stuffed dough balls in granulated sugar before baking. The sugar will crack as the cookie rises, creating a beautiful snowy contrast against the red.
Dietary Changes If you need a gluten-free version, almond flour can work, but the cookies will be much softer. If you're looking for an egg substitute, this guide on egg substitutes is a great resource, though keep in mind that eggs are vital for the chewiness of this specific dough.
Adjusting Batch Sizes
Scaling baking is a bit like chemistry; you can't always just double everything and expect the same result.
Scaling Down (Half Batch) If you only need 6 cookies, use 1/4 cup of butter and 3/8 cup of sugar. For the egg, crack one into a bowl, whisk it, and use exactly 25g. Reduce the baking time by about 1-2 minutes since smaller batches can sometimes cook faster.
Scaling Up (Double Batch) When doubling, don't double the baking soda or salt exactly; use about 1.5x the amount to avoid a metallic taste. Work in batches so your mixer doesn't overheat.
I recommend lowering the oven temperature to 165°C and extending the bake time by 2 minutes to ensure the centers of the larger volume of cookies cook through.
| Goal | Adjustment | Impact |
|---|---|---|
| More Height | Chill dough 2 hours | Less spread, taller cookie |
| More Fudgy | Reduce flour by 20g | Denser, browner center |
| Tangier Taste | Add 1/2 tsp lemon juice | Brighter filling |
Common Baking Misconceptions
There are a few things people tell you about red velvet that just aren't true. Let's clear the air.
The Cocoa Myth Some believe red velvet is just chocolate cake with dye. It's not. The specific interaction between the cocoa, the acid, and the leavening agent creates a unique texture that is distinct from a standard chocolate cookie.
The Vinegar Necessity You'll see old recipes calling for a tablespoon of vinegar. While that was the original way to get the red color, modern gel coloring and lemon juice do the job much better without leaving a sharp aftertaste.
Storage Guidelines
Since these have a cream cheese center, you have to be a bit more careful than you would with a standard chocolate chip cookie.
Fridge and Freezer Store these in an airtight container in the fridge for up to 5 days. Because of the dairy filling, leaving them on the counter for too long in a warm kitchen isn't a great idea. For the freezer, wrap them individually in parchment and place them in a freezer bag for up to 3 months.
Reheating for Freshness To get that "just baked" feel, pop a chilled cookie in the microwave for 8-10 seconds. This softens the butter in the dough and makes the cream cheese center velvety again without melting it into a liquid.
Zero Waste Tips If you have a bit of cream cheese filling left over, don't toss it! Mix it into some Greek yogurt for a quick breakfast dip or use it as a frosting for a small batch of cupcakes.
If you have leftover red dough, roll it into tiny balls and bake them as "bite sized" red velvet treats without the filling.
Serving Suggestions
These cookies are quite rich, so they pair best with something that cuts through the sweetness. A cold glass of almond milk or a hot cup of black coffee is the way to go.
If you're serving these at a party, I love arranging them on a white platter to make the crimson color pop. You can dust them with a little bit of powdered sugar right before serving for a professional finish. If you want a full dessert spread, these go wonderfully alongside some Homemade Cinnamon Rolls for a mix of savory sweet and tangy flavors.
Trust me on this: the first bite is always the best, but the way they look on the plate is what gets everyone talking. Just make sure you have some napkins ready, as that creamy center can be a bit messy!
Recipe FAQs
What are common red velvet cookie mistakes?
Overbaking or skipping the dough chill. Overbaking dries out the centers, while skipping the 30-minute refrigerator rest causes the cookies to spread too much and lose their shape.
What does adding cream cheese to cookies do?
It adds a tangy contrast and a creamy texture. The acidity of the filling balances the sweetness of the cocoa and powdered sugar for a more complex flavor.
How to prevent the cream cheese filling from leaking?
Freeze the cream cheese balls for at least 60 minutes. This ensures the filling is hard enough to stay contained while the dough sets in the oven.
Can I store these cookies on the counter?
No, keep them in the fridge. Because of the dairy based filling, these must be stored in an airtight container in the refrigerator for up to 5 days to ensure safety.
Can I use a different flour for this recipe?
Stick with all-purpose flour for the best structure. If you enjoyed the velvety crumb achieved here, see how the same fat ratio logic applies to our homemade chocolate cake.
Is it true that red velvet cookies are just chocolate cookies with food coloring?
No, this is a common misconception. Red velvet uses a specific low-cocoa ratio and relies on acidity like the lemon juice in the filling to create a distinct flavor and color profile.
How to reheat these cookies?
Microwave a chilled cookie for 8-10 seconds. This quickly softens the butter and restores the "just baked" feel.
Red Velvet Cream Cheese Cookies

