Grilled Corn in Foil: Garlic Butter
- Time:5 minutes active + 15 minutes grill = Total 20 minutes
- Flavor/Texture Hook: Nutty, velvety garlic butter with juicy, tender kernels
- Perfect for: Summer BBQs, easy side dishes, and beginner grillers
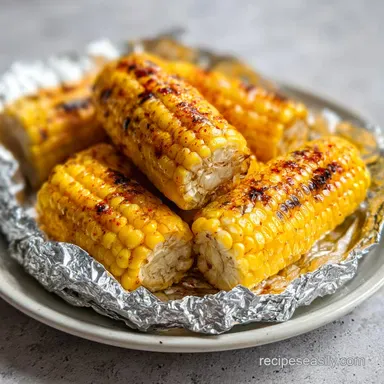
Grilled Corn on the Cob in Foil with Garlic Butter
The first thing you'll notice is that heavy, savory sizzle the second you peel back the foil. I remember a family reunion a few years back where we tried to go the "traditional" route, grilling corn naked on the grates.
Half of it was charred black and the other half was barely warm, and honestly, we spent more time scrubbing the grill than eating. I was frustrated, so I grabbed some foil from the kitchen and improvised a butter wrap. The result was a total shift - juicy, buttery corn that actually tasted like the garlic I'd added.
This is the ultimate recipe for Grilled Corn on the Cob in Foil with Garlic Butter. It removes all the guesswork from the grill. You don't have to hover over the fire or worry about the corn drying out in the wind.
Instead, the foil does the heavy lifting, steaming the corn in its own juices and a rich, aromatic butter blend.
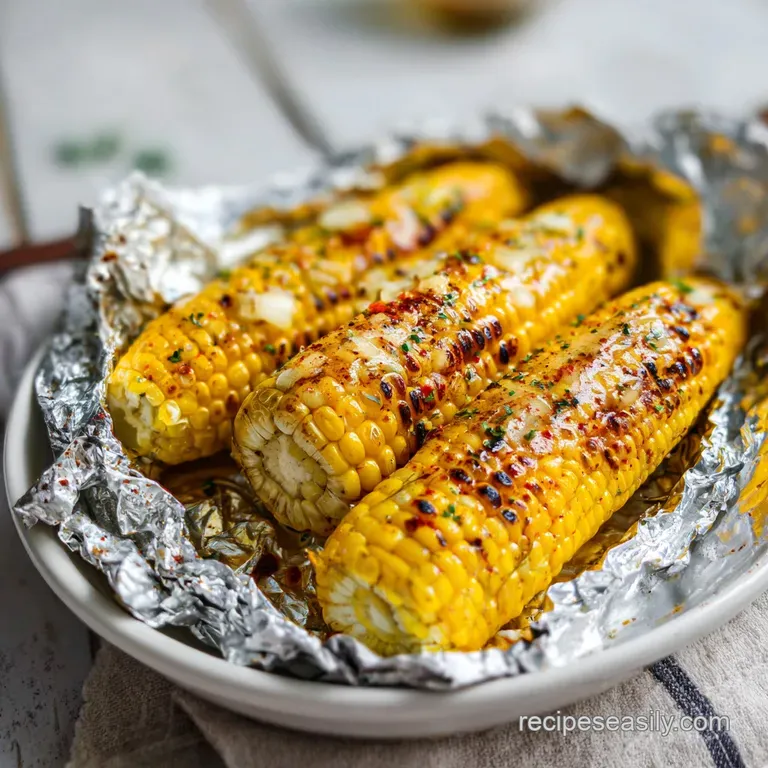
You can expect a side dish that feels a bit more special than standard boiled corn but takes almost the same amount of effort. The kernels stay plump and snap when you bite into them, all while being coated in a velvety layer of garlic and paprika. It's a quick win that makes you look like a pro without the stress.
The Foil Trick Logic
Since we're wrapping the corn, we're essentially creating a mini oven for each ear. Here is why this method beats the naked grill every time:
- Steam Chamber: The foil traps moisture inside, preventing the corn from drying out and ensuring the kernels stay plump.
- Fat Infusion: The melted butter acts as a carrier, pulling the minced garlic and paprika deep into the crevices of the cob.
- Heat Buffer: The aluminum layer protects the corn from direct flame, which stops the exterior from burning before the center is cooked.
| Method | Time | Texture | Best For |
|---|---|---|---|
| Foil Wrap | 15 min | Juicy and Velvety | Maximum flavor infusion |
| In Husk | 20 min | Steamed and Mild | Natural, rustic look |
| Naked Grill | 10 min | Charred and Smokey | Quick, over high heat sear |
The Quick Game Plan
Before we get into the nitty gritty, let's look at the essentials. I've found that the quality of your corn makes or breaks this dish. Look for husks that are bright green and feel slightly damp, not dried out. If the silk is brown and brittle, the corn is likely past its prime.
I usually buy my corn in bunches of four. It's the perfect amount for a small family dinner, but if you're feeding a crowd, just double the butter and garlic. One thing I've learned the hard way: don't be stingy with the butter.
The corn absorbs a lot of it during the steaming process, and that buttery residue is where all the flavor lives.
If you're looking for other ways to use corn, you might enjoy my Mexican Street Corn Casserole, which takes those same creamy, cheesy notes and turns them into a bake. But for a pure, outdoor experience, the foil method is unbeatable.
The Garlic Butter Breakdown
To get that rich, savory taste, you need a few key players working together. It's not just about the butter, but how the aromatics interact with the heat.
| Ingredient | Science Role | Pro Secret |
|---|---|---|
| Unsalted Butter | Flavor Vehicle | Use unsalted so you can control the sea salt levels exactly |
| Minced Garlic | Aromatic Base | Let it "bloom" in warm butter for 2 mins before brushing |
| Paprika | Color and Earthiness | Adds a subtle smokiness that mimics a charcoal grill |
Picking Your Corn
I always tell my friends to feel the kernels through the husk. Give the ear a gentle squeeze - you want them to feel firm and full. If there are gaps between the kernels, that ear is going to be disappointing. Once you peel back the husks and silk, make sure the corn is completely dry.
If the corn is wet when you apply the butter, the fat will slide right off instead of clinging to the kernels.
The Butter Blend
The magic happens in the mixing bowl. By melting the butter and stirring in the garlic, salt, pepper, and paprika, you're creating an emulsion of flavors. The paprika isn't just for the reddish hue, it provides a baseline earthiness that cuts through the richness of the butter.
I prefer cracked black pepper over fine powder because it adds a tiny bit of texture and a sharper bite.
Your Essential Kitchen Gear

You don't need a fancy outdoor kitchen for this. In fact, the simpler the better. A standard grill (gas or charcoal) works perfectly. The only thing I'm strict about is the foil.
I suggest using heavy duty aluminum foil - not an ingredient, but you'll need this! We don't bother buying the heavy duty/grilling foil. Just the regular stuff works fine as long as you don't poke holes in it. If you use foil that's too thin, you might get leaks, and all that liquid gold butter will end up on your grill grates instead of your corn.
You'll also want a silicone pastry brush. Using a spoon to apply the butter is fine, but a brush allows you to really push the garlic into the rows of corn. This ensures that every single bite is seasoned, not just the top surface.
Step by step Grilling
Right then, let's get to the actual cooking. This process is fast, but the timing is key to getting that tender snap.
- Melt the butter in a microwave safe bowl in 20 second bursts. Stir in the minced garlic, salt, pepper, and paprika. Note: Let the mixture sit for 2 minutes to allow the garlic to bloom in the warm fat.
- Tear off four 12 inch pieces of heavy duty aluminum foil. Place one ear of corn in the center of each sheet.
- Generously brush the garlic butter from end to end, ensuring the butter penetrates between the rows of kernels.
- Fold the foil tightly around the corn, twisting the ends like a candy wrapper to create an airtight seal.
- Place the foil packets directly on the grill grates over medium high heat.
- Grill for 15 minutes, turning the packets every 5 minutes, until the foil is browned and a nutty garlic aroma escapes.
Chef's Tip: If you want a bit of a char, open the foil packets for the last 2 minutes of grilling and let the corn hit the direct heat. It adds a smoky edge that contrasts beautifully with the buttery interior.
Common Corn Fails
Even a simple recipe can go sideways if the heat is too high or the seal isn't tight. I've definitely had my fair share of "butter leaks" in the past.
Why Your Corn is Mushy
If the corn feels overly soft or lacks that "snap," it's usually because it was left on the grill too long. Corn doesn't need hours to cook in foil; it's more of a steaming process. 15 minutes is the sweet spot.
Any longer and you're essentially boiling the corn in butter, which can break down the cell walls too much.
Why the Garlic Burnt
Burnt garlic tastes bitter and can ruin the whole batch. This usually happens if the foil isn't sealed tightly, allowing the butter to leak out and the garlic to hit the grill grates directly. Ensure those ends are twisted tight like a candy wrapper.
| Problem | Root Cause | Solution |
|---|---|---|
| Butter Leaks | Loose foil seal | Twist ends tighter |
| Bland Flavor | Not enough salt | Brush butter more generously |
| Raw Kernels | Low grill temp | Ensure heat is medium high |
Essential Prevention Checklist
- ✓ Pat corn completely dry after removing husks
- ✓ Use a pastry brush for even butter distribution
- ✓ Double check the foil seal for gaps
- ✓ Turn packets every 5 minutes for even heat
- ✓ Remove from grill immediately once the nutty aroma hits
Fresh Flavor Variations
While the garlic butter is a classic, you can easily tweak this to match whatever you're grilling. If you're doing seafood, maybe add a squeeze of lemon juice to the butter. If you're doing spicy ribs, a pinch of cayenne pepper in the mix works wonders.
For those who want something a bit more daring, try adding a tablespoon of honey to the butter. The sweetness caramelizes against the corn, and the garlic keeps it from feeling like a dessert. It's a brilliant combo that always surprises people at parties.
If you have leftover corn from a big batch, don't let it go to waste. I love chopping up the grilled kernels and mixing them into my Potato Corn Fritters for a smoky brunch side. It's a great way to use up every bit of your produce.
| Original Ingredient | Substitute | Why It Works |
|---|---|---|
| Unsalted Butter | Coconut Oil | Same fat content. Note: Adds a tropical coconut flavor |
| Garlic Cloves | Garlic Powder | Concentrated flavor. Note: Less "punchy" than fresh garlic |
| Paprika | Smoked Paprika | More intense smoke. Note: Can overpower the corn if too much is used |
Storage and Scrap Tips
Grilled corn is best eaten the moment it comes off the fire, but we've all had leftovers. To store them, let the corn cool completely, then place the ears in an airtight container or a zip top bag. They'll stay good in the fridge for about 3-4 days.
When you're ready to eat them again, avoid the microwave if you can. It makes the kernels rubbery. Instead, wrap them back in foil and pop them in a 350°F (180°C) oven for about 10 minutes. This refreshes the butter and brings back that tender texture.
As for zero waste, don't just toss the husks. If you have a compost bin, corn husks are gold. They break down quickly and add great organic matter to the soil. If you're feeling fancy, you can actually dry out some of the cleaner husks to use as decorative wraps for other grilled vegetables.
Plating for the Table
Presentation is everything, even for something as humble as corn. Instead of just throwing the foil packets on a plate, I like to arrange the ears on a large wooden platter. Line the platter with a few fresh, cleaned corn husks to give it a rustic, farm to table look.
Sprinkle a little extra sea salt and a pinch of fresh parsley over the top right before serving. The green of the parsley pops against the yellow corn and red paprika, making the dish look vibrant.
Since the corn is slippery with butter, serve it with a stack of thick napkins or a bowl of lemon wedges. The acidity of the lemon cuts through the richness of the garlic butter, refreshing the palate between bites. It's a simple touch, but it makes the whole meal feel more cohesive.
Recipe FAQs
Should corn be wrapped in foil before grilling?
Yes, it locks in moisture. Wrapping the corn creates a steam chamber that keeps the kernels tender while infusing them with the garlic butter.
Do you butter corn on the cob before or after grilling?
Butter them before grilling. Brushing the garlic butter on before sealing the foil allows the flavors to penetrate deep into the rows of kernels.
How long for corn on the cob in foil?
Grill for 15 minutes. Use medium high heat and rotate the packets every 5 minutes until a nutty garlic aroma escapes.
How long should you grill corn on the cob on a grill?
15 minutes is the sweet spot. This duration ensures the corn is cooked through and the butter is fully absorbed without overcooking the kernels.
Is it true that frozen corn works as well as fresh for this recipe?
No, this is a common misconception. Fresh corn provides a superior snap and natural sweetness that frozen corn cannot replicate when steamed in foil.
How to reheat leftover grilled corn?
Wrap in foil and bake at 350°F for 10 minutes. Avoid using a microwave, as it often makes the kernels rubbery instead of tender.
What are the best side dishes to serve with grilled corn?
Pair it with a savory protein. This corn complements a main dish like baked salmon for a cohesive, garlic forward meal.
Garlic Butter Grilled Corn