Sauteed Green Beans: Blistered and Tender
- Time:5 minutes active + 10 minutes cook = 15 minutes total
- Flavor/Texture Hook: Blistered skins with a snappy, tender center
- Perfect for: Fast weeknight sides or impressive dinner party additions
- Get That Perfect Char on Sauteed Green Beans
- Quick Timing and Yield
- The Secret to the Snap
- Choosing Your Fresh Elements
- The Right Tools for Searing
- Step by Step Cooking Guide
- Fixing Texture and Flavor Issues
- Twists for Different Tastes
- Storage and Waste Tips
- The Best Meal Matches
- Recipe FAQs
- 📝 Recipe Card
Get That Perfect Char on Sauteed Green Beans
That first hiss when the beans hit the shimmering oil is the sound of success. I remember years ago, I used to boil my beans first, thinking that was the only way to get them tender. All I ever got was a plate of limp, olive drab sticks that tasted like watery grass. It was honestly depressing.
Then I tried just tossing them straight into a hot pan with a bit of fat, and the difference was night and day.
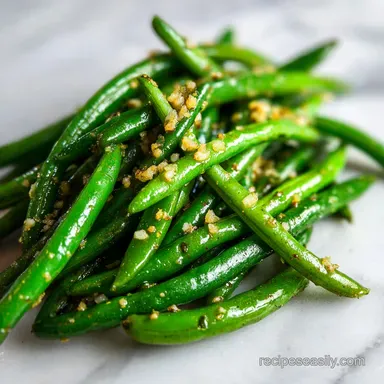
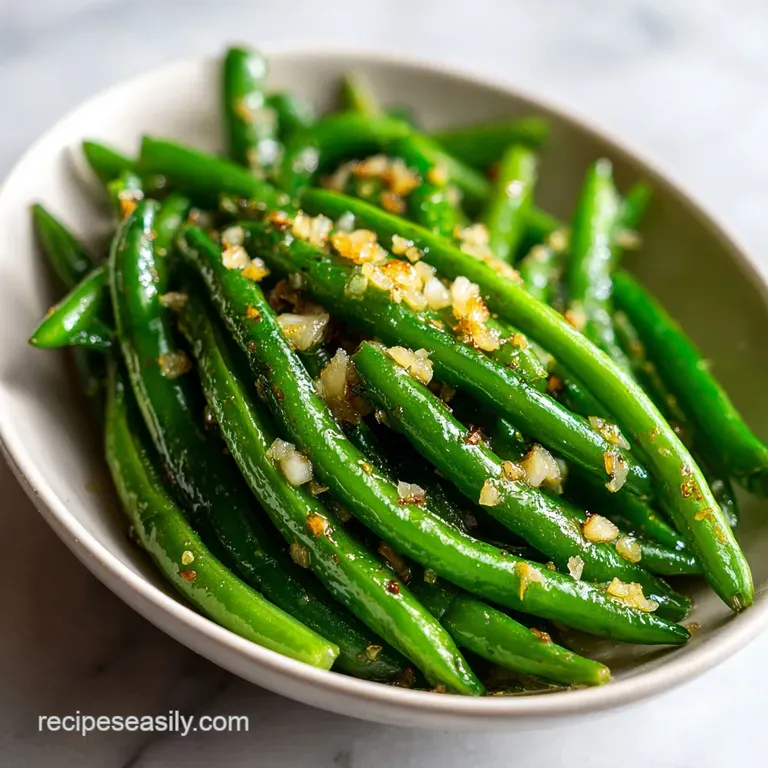
The magic is in the blister. When you see those little mahogany colored spots forming on the skin, you know you've hit the sweet spot. It's a total shift in flavor, moving from "boiled vegetable" to something that actually tastes like it was cooked by someone who knows what they're doing.
Trust me, once you see the skin shrivel and brown, you'll never go back to the pot of water.
We're going for a specific contrast here. You want a bean that has a slight resistance when you bite into it- a snap, not a crunch, and definitely not a mush. This recipe is all about timing and temperature, keeping things moving so the garlic stays fragrant but doesn't turn bitter. Let's crack on.
Quick Timing and Yield
Before we get into the heat, let's look at the basic numbers. This is a fast process, but the 10 minutes of cooking are intense. You can't really walk away from the stove during this part because the butter and garlic can go from "perfect" to "burnt" in about thirty seconds.
The yield is meant for 4 people as a side dish. If you're serving this as part of a huge feast with five other sides, you could probably stretch it to 6. But for a standard dinner, 1 lb of beans is the sweet spot for a group of four.
| Method | Time | Texture | Best For |
|---|---|---|---|
| Stovetop Sauté | 15 mins | Blistered & Snappy | Weeknight Speed |
| Blanched & Sautéed | 25 mins | Uniformly Soft | High Volume/Prep |
| Roasted | 20 mins | Shriveled & Sweet | Hands off Cooking |
It's important to note that while the total time is 15 minutes, the actual "hands on" work is very minimal. Most of it is just watching the beans change color and giving them a toss every few minutes.
The Secret to the Snap
I've spent a lot of time wondering why some people's beans come out soggy while others look like they came from a bistro. It usually comes down to a few basic rules of how heat and moisture interact in the pan.
Water is the Enemy: When beans are wet, they steam instead of sear. Steam keeps the temperature low and softens the cell walls too quickly, leading to that mushy texture.
The Fat Buffer: We use olive oil for the over high heat phase because it can take the heat without smoking. The butter comes in later for the velvety finish and that nutty aroma that oil just can't provide.
The Garlic Window: Garlic has a much lower burn point than the beans. By adding it at the very end, we get the aroma without the acrid, bitter taste of burnt cloves.
The Acid Balance: A tiny splash of lemon juice at the end isn't just for flavor. The citric acid brightens the earthy tones of the beans and cuts through the richness of the butter.
Choosing Your Fresh Elements
Not all beans are created equal. If you can find Haricots Verts, those thin French beans are brilliant for this because they cook even faster and have a more delicate snap. However, standard supermarket green beans work just as well as long as they're firm to the touch.
Note: If the beans feel bendy or rubbery in the bag, they're already losing moisture and won't blister as well.
| Original Ingredient | Substitute | Why It Works |
|---|---|---|
| Olive Oil (2 tbsp) | Avocado Oil (2 tbsp) | Higher smoke point. Note: Neutral flavor, less "fruitiness" than olive oil |
| Unsalted Butter (1 tbsp) | Ghee (1 tbsp) | More nutty flavor. Note: Higher heat tolerance than regular butter |
| Fresh Lemon Juice (1 tsp) | Apple Cider Vinegar (1 tsp) | Similar acidity. Note: Adds a slightly sweeter, fermented tang |
| Fresh Garlic (3 cloves) | Garlic Powder (1/2 tsp) | Convenient. Note: Lacks the pungent, fresh bite of minced garlic |
The fresh lemon juice is a non negotiable for me. It's a tiny amount, but it's what makes the dish feel professional. If you're feeling fancy, you can use a Meyer lemon for a sweeter, more floral note.
The Right Tools for Searing

You don't need a professional kitchen, but the pan you choose actually changes the result. I prefer a heavy stainless steel or cast iron skillet. These materials hold onto heat much better than thin non stick pans, which is exactly what you need to get those mahogany blisters.
A non stick pan works, but it doesn't brown as effectively. If you use one, you might find you have to cook the beans a bit longer to get the color you want. Just make sure your pan is large enough. If the beans are piled on top of each other, they'll steam, and you'll lose that sear.
Chef Tip: If you're doing a double batch, use two pans. Overcrowding is the fastest way to ruin this recipe. It's better to work in batches than to end up with soggy beans.
Step by step Cooking Guide
Right then, let's get to the actual cooking. Keep your ingredients prepped and ready; once the oil is hot, things move quickly.
The Prep Phase
- Wash the green beans and pat them completely dry with a paper towel. Note: This is the most important step to avoid steaming.
- Trim approximately 1/4 inch from the stem ends. Don't over trim, or you'll lose the best part of the bean.
The High Heat Sear
- Place a large skillet over medium high heat and add the olive oil.
- Wait until the oil shimmers. Add the green beans in a single layer.
- Let the beans sit undisturbed for 2-3 minutes until mahogany colored blisters form on the skin.
- Toss and sauté for another 3-5 minutes until the beans are tender but still have a snap.
The Flavor Finish
- Reduce the heat to medium. Stir in the unsalted butter and minced garlic.
- Sauté for 60-90 seconds until the butter is foamy and the garlic is fragrant.
- Remove the pan from the heat immediately.
- Sprinkle with salt and black pepper, then stir in the lemon juice.
Fixing Texture and Flavor Issues
Even the best of us mess up. Maybe the heat was too high, or maybe the beans were a bit too old. Most of these issues are easy to fix if you catch them in time.
Why Your Beans Are Mushy
This almost always happens because of too much moisture in the pan or overcrowding. If the beans are releasing water, they're boiling in their own juices instead of searing. To fix this, turn up the heat and don't stir too often.
Why Your Garlic Tastes Bitter
If your garlic turned dark brown or black, it's burnt. This happens if the pan is too hot when the butter goes in, or if you leave the garlic in for more than two minutes. If this happens, you can't "un burn" it, but adding an extra squeeze of lemon can sometimes mask the bitterness.
| Problem | Root Cause | Solution |
|---|---|---|
| Beans are grey/pale | Heat too low | Increase to medium high; stop stirring for 2 mins |
| Garlic is burnt | Heat too high/Too long | Add butter at the very end; remove from heat sooner |
| Beans are tough | Undercooked/Old beans | Add 1 tbsp water and cover for 60 seconds to steam |
- ✓ Pat beans completely dry before they touch the oil
- ✓ Ensure the oil is shimmering before adding vegetables
- ✓ Don't crowd the pan; leave space between beans
- ✓ Remove from heat the moment the garlic smells fragrant
Twists for Different Tastes
Once you've got the base down, you can really play around with this. These are some of my favorite ways to change the vibe of the dish. If you're looking for a full meal, these beans pair beautifully with an Easy Chicken Green Bean StirFry style approach.
The Smoky Twist
Add 2 slices of chopped bacon to the pan before the beans. Render the fat until crispy, remove the bacon bits, and use that bacon grease instead of olive oil. Stir the crispy bits back in at the end.
The Nutty Crunch
Toss in a handful of toasted slivered almonds right after the lemon juice. It adds a shatter like texture that contrasts the snap of the beans.
The Asian Glaze
Replace the butter and lemon with a mixture of 1 tbsp soy sauce, 1 tsp toasted sesame oil, and a pinch of brown sugar. Add this in the last 60 seconds of cooking.
Using Frozen Beans
You can't get the same blister with frozen beans because they have too much internal moisture. Instead, sauté them on medium high until the water evaporates, then add the butter and garlic. They'll be more tender and less snappy, but still great.
Storage and Waste Tips
Freshly sautéed beans are best served immediately, but we all have leftovers. The challenge is keeping that snap when you reheat them.
Store the beans in an airtight container in the fridge for up to 4 days. When you're ready to eat them, don't use the microwave if you can avoid it, as that just turns them into mush. Instead, toss them into a hot pan for 2 minutes to wake up the flavors.
I don't recommend freezing these after they've been sautéed, as the texture becomes grainy.
To avoid waste, don't throw away the trimmed stem ends. I keep a bag of vegetable scraps in the freezer, and those woody bean stems are great for adding a subtle earthiness to a homemade vegetable stock.
The Best Meal Matches
These beans are a versatile side, but they really shine when paired with something rich or protein heavy. Because of the lemon and garlic, they cut through fatty meats perfectly.
They are a dream next to a seared steak or a piece of roasted salmon. If you want something more comforting, they balance out a creamy pasta or some Tasty Creamy Butter Beans for a vegetarian heavy spread.
For a lighter meal, serve them alongside grilled halloumi or a piece of lemon herb chicken. The key is to keep the other components of the meal simple so the bright, charred flavor of the beans can stand out.
Recipe FAQs
How long do green beans need to be sautéed?
Sauté for 5 to 9 minutes total. Let the beans sit undisturbed for 2 3 minutes to blister, then toss for another 3 5 minutes before adding the garlic for the final 90 seconds.
Should I boil green beans before sautéing?
No, boiling is unnecessary. Sautéing fresh, dry beans over medium high heat preserves the snap and creates a superior mahogany color.
What to add to sautéed green beans?
Use butter, minced garlic, and fresh lemon juice. These enhance the natural flavor of the beans and pair perfectly with a creamy main like my butter beans.
Can diabetics eat green beans?
Yes, they are an excellent choice. Green beans are low in carbohydrates and high in fiber, making them very blood sugar friendly.
How to store leftover sautéed green beans?
Place them in an airtight container in the fridge for up to 4 days. Avoid freezing them, as the texture becomes grainy after the sautéing process.
Why do my green beans get mushy when reheated?
Microwaving typically destroys the cellular structure of the bean. To maintain a crisp texture, toss them into a hot pan for 2 minutes instead.
Is it true I must blanch green beans first to ensure they are tender?
No, this is a common misconception. Sautéing directly in olive oil over medium high heat achieves a perfect tender crisp result without the extra step of boiling.
Sauteed Green Beans With Garlic