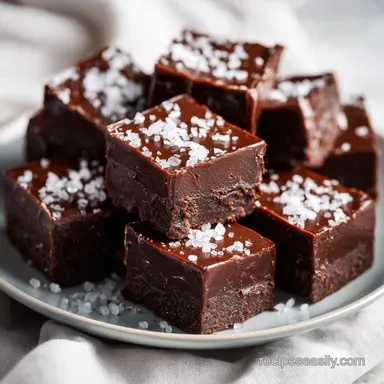
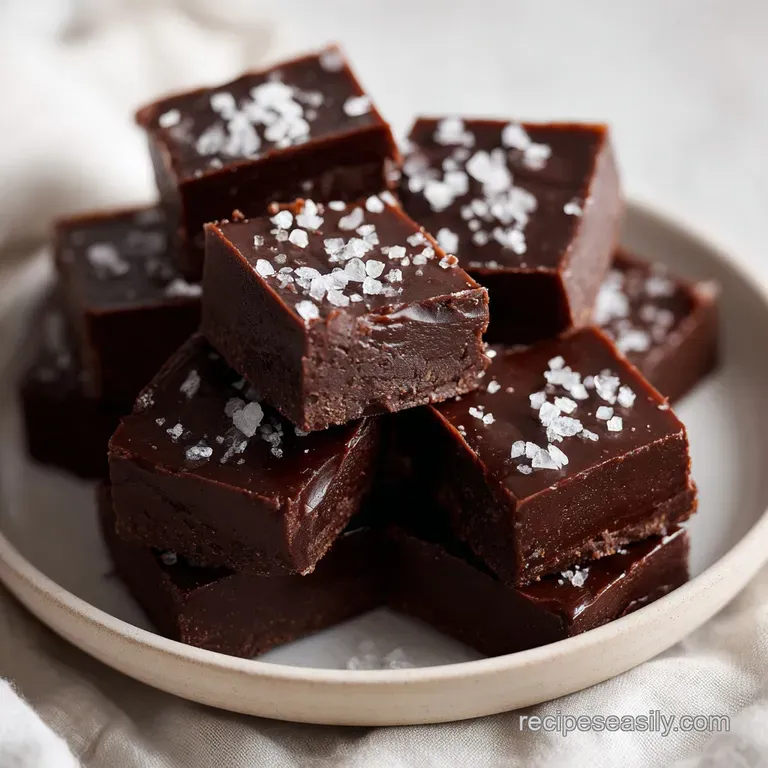
Easy Chocolate Fudge: Silky and Rich
- Time: 10 min active + 2 hrs 12 mins chilling = Total 2 hrs 12 mins
- Flavor/Texture Hook: Silky, rich, and melts instantly on the tongue
- Perfect for: Last minute gifts or a midnight sugar craving
I still remember the "Great Fudge Disaster" of 2016. I tried an old school stovetop recipe for my aunt's birthday, and I spent an hour hovering over a pot, praying the temperature would hit exactly 235°F. I missed it by a hair, and the result was a grainy, sandy mess that felt like eating wet cardboard.
I almost gave up on homemade fudge forever.
Then I found the magic of the microwave and condensed milk. No more stressing over sugar crystals or expensive thermometers. Now, the smell of melting cocoa fills my kitchen in minutes, and the result is a glossy, dense square that actually snaps when you bite into it.
You're going to love this because it's practically impossible to mess up. Whether you're a total beginner or a seasoned pro, this easy chocolate fudge recipe delivers that high end confectionery feel without the stress of a professional kitchen. Let's get into it.
This Easy Chocolate Fudge Recipe
The Secret Stabilizer: Condensed milk replaces the traditional boiling of sugar and milk, preventing the "grainy" texture common in old-fashioned fudge.
Fat Emulsion: The butter blends with the cocoa butter in the chips, creating a velvety mouthfeel that doesn't feel greasy.
Controlled Heat: Microwaving in short bursts prevents the chocolate from scorching, which would otherwise make the fudge taste burnt and bitter.
Salt Balance: A tiny pinch of sea salt cuts through the intense sweetness of the condensed milk, making the chocolate flavor pop.
| Method | Time | Texture | Best For |
|---|---|---|---|
| Microwave | 12 mins | Silky | Quick cravings |
| Stovetop | 45 mins | Crystalline | Traditionalists |
Component Analysis
| Ingredient | Science Role | Pro Secret |
|---|---|---|
| Chocolate Chips | Structure & Fat | Use a higher quality brand for a deeper snap |
| Condensed Milk | Sugar/Binder | Prevents sugar crystallization |
| Butter | Emulsion | Cubed small for faster melting |
| Vanilla Extract | Aroma | Stir in at the end to keep flavor |
The Essential Ingredients
- 3 cups (525g) semi sweet chocolate chips Why this? Provides the core structure and rich cocoa base
- 1 can (14 oz / 397g) sweetened condensed milk Why this? Acts as the sweetener and thickening agent
- 1/4 cup (55g) unsalted butter, cut into cubes Why this? Adds a silky sheen and creamy finish
- 1 tsp (5ml) pure vanilla extract Why this? Rounds out the chocolate notes
- 1/4 tsp (1.5g) fine sea salt Why this? Balances the sugar levels
| Original Ingredient | Substitute | Why It Works |
|---|---|---|
| Semi sweet chips | Dark Chocolate (70%) | More intense cocoa. Note: Less sweet, slightly firmer |
| Unsalted Butter | Coconut Oil | Vegan friendly. Note: Softer set, slight coconut hint |
| Vanilla Extract | Maple Syrup | Adds woody sweetness. Note: Alters the aroma slightly |
Right then, before we start, here are a few tricks I've picked up. For Pro Tips, always use a glass bowl - plastic can warp or hold onto old smells. Also, don't overmix once the butter is in, or you'll introduce air bubbles. Finally, make sure your chocolate chips are room temperature so they melt evenly.
For a few Chef's Tips: try freezing your butter cubes for 10 mins before adding them - it slows the melt slightly and creates a more stable emulsion. Also, if you want a deeper color, add a pinch of instant espresso powder to the chocolate.
Step-by-step Guide
Prep the Pan
Line your 8x8 inch pan with parchment paper, leaving an overhang on the sides to allow for easy removal. Note: This prevents the fudge from sticking to the corners.
The Microwave Melt
Combine the chocolate chips and sweetened condensed milk in a large microwave safe glass bowl. Microwave on high for 1 minute, then remove and stir.
Heat in Bursts
Continue microwaving in 30 second bursts, stirring in between, until the mixture is completely smooth and glossy. Note: Stirring prevents the edges from burning.
Add the Butter
Remove the bowl from the microwave. Stir in the cubed butter. Mix gently until the butter is fully melted.
Final Seasoning
Stir in the vanilla extract and salt. Mix until the fudge looks like a cohesive, thick ribbon.
Fill the Pan
Pour the mixture into the prepared pan. Use a spatula to smooth the top.
The Chill
Place the pan in the refrigerator for at least 2 hours.
The Set
Wait until the fudge is firm to the touch and no longer jiggles before removing it from the pan.
Fixing Common Issues

Why Your Fudge Grainy
This usually happens if the chocolate was overheated or if you used a low quality chocolate with too many stabilizers. If it happens, you can't really "un grain" it, but you can melt it down and try again.
Why Not Setting Firmly
If the fudge is still soft after 2 hours, your fridge might be too warm, or you might have used a chocolate with a very high cocoa butter content. Give it another hour or move it to a colder spot.
Mixture Too Thick
If the fudge becomes too stiff to pour, microwave it for 10 seconds just to loosen it up. Don't overdo it, or you'll ruin the set.
| Problem | Root Cause | Solution |
|---|---|---|
| Dull Surface | Over stirring | Stir gently, only until combined |
| Oily Film | Overheating | Use shorter microwave bursts |
| Too Sweet | Missing Salt | Sprinkle flaky salt on top after setting |
Mistakes Checklist:
- ✓ Did you line the pan with parchment?
- ✓ Did you stir every 30 seconds in the microwave?
- ✓ Is the butter cubed small?
- ✓ Did you let it chill for the full 2 hours?
Adjusting Batch Sizes
If you're making a smaller batch (half), use a 4x4 or small loaf pan. Reduce the microwave time by about 20% and keep a close eye on it, as smaller volumes heat up faster.
For doubling the recipe, I highly suggest working in two separate bowls. If you crowd the microwave with too much chocolate and milk, the center stays cold while the edges burn. If you're feeling brave and doubling it in one go, extend the initial 1 minute burst to 2 minutes, but keep the 30 second intervals.
Trust me, two batches are safer.
Debunking Fudge Myths
Some people say you need a candy thermometer for a successful chocolate fudge recipe. That's just not true for this method. The condensed milk acts as a chemical stabilizer, meaning you don't need to hit a specific temperature to get a velvety set.
Another myth is that using "real" chocolate bars is always better than chips. While bars are great, chips are formulated to hold their shape and contain stabilizers that actually help this specific microwave method stay smooth.
Storing Your Fudge
Keep your fudge in an airtight container in the fridge for up to 2 weeks. It stays much firmer and has a better snap when cold. For longer storage, you can freeze it for 3 months. Just wrap the squares individually in parchment paper so they don't stick together.
To avoid waste, if you have a few broken bits or "ugly" edges, don't throw them away. Toss them into a blender with a splash of warm milk and a pinch of cinnamon for an instant, rich chocolate milkshake.
Tasty Twist Ideas
If you want to shake things up, try swirling in some creamy peanut butter or adding crushed pretzels for a salty crunch. If you're on a chocolate binge, my chocolate cake recipe is another winner.
For a more adult version, fold in a teaspoon of orange liqueur or some finely chopped candied ginger. You can also make a microwave chocolate fudge recipe with cocoa powder by mixing the powder into the milk first, though the chip method provides a more consistent snap.
Great Pairing Ideas
These rich squares are quite intense, so they pair best with something acidic or light. Fresh raspberries or a slice of tart green apple cut through the richness beautifully.
If you're putting together a dessert platter, these squares go well with something creamy, like cheesecake bars. A strong, black coffee or a glass of cold milk is the classic way to enjoy this easy chocolate fudge recipe. Just keep them chilled until serving for the best experience.
Recipe FAQs
How to make really easy fudge?
Combine chocolate chips and sweetened condensed milk in a microwave safe glass bowl. Heat in 30-second bursts until smooth, stir in butter, vanilla, and salt, then chill for 2 hours.
What are the three main ingredients in this chocolate fudge recipe?
Semi sweet chocolate chips, sweetened condensed milk, and butter. These create the core structure, supported by vanilla and salt. If you enjoyed the flavor balancing here, see how we apply a similar approach in our apple pie filling.
What is the secret to perfect fudge?
Allowing the fudge to chill for at least 2 hours. This ensures the mixture sets firmly and develops a glossy, cohesive snap.
What is the best way to make chocolate fudge?
Use a microwave to melt ingredients in short intervals. This prevents the chocolate from scorching and produces a smooth, thick ribbon consistency.
Is it true that fudge must be boiled on a stove to set?
No, this is a common misconception. Using sweetened condensed milk allows the fudge to set in the refrigerator without needing a candy thermometer or boiling.
How long can I store homemade fudge?
Store in an airtight container in the fridge for up to 2 weeks. For longer storage, wrap squares individually in parchment paper and freeze for 3 months.
Why is my fudge too soft to cut?
It likely hasn't chilled long enough. Keep the pan in the refrigerator for at least 2 hours until the fudge is firm to the touch and no longer jiggles.
Easy Chocolate Fudge Recipe